Spar Urethane not fully covering walnut

John Gerken

New User
John
Hi all,

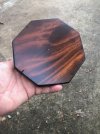
I'm attempting to restore an old set of windchimes that had sat outside for many years. The wood pieces appear to be nice pieces of walnut that I was able to progressively sand up to 240 grit before spraying with Spar Urethane. The wood was not stained and I've used this product for outside products a number of times and it's always produced a nice finish. But in this case, the product just wouldn't seem to build up on certain areas of the wood. As a result, I ended up with too much product in some places and seemingly very little in others. Is there a different method/product/etc. that I could try instead to get a consistent finish that is suitable for exposed outdoor use?
IMG_8170.jpeg


IMG_8171.jpeg


Thanks for your help!
John
 

Willemjm

Willem
Corporate Member
If you were close to Pinehurst, I would say bring it over and we will send it through the sander and then apply a professional finish. The whole process should take no more than 10 minutes and another 15-30 minutes to dry towards handling.

Never used that product, but I would suggest you apply the finish real thick in the blotched areas, perhaps a few times, let it cure, sand it down and start over.
 

Graywolf

Board of Directors, President
Richard
Staff member
Corporate Member
I’ve used that product but not the spray can. That said the grain pattern looks as though you either have end grain rising of just soft grain against tight grain. Either way you will need to let the finish cure and then sand it down after that apply more finish. For that project you chose a good product for that application. I probably would have bought a pint or a quart and used a brush but the spray can should work. Stay with it and share your progress. It may take a few coats to get what you want.
 

HMH

Heath Hendrick
Senior User
That is weird - being that you mentioned it sat outside for a few years, and was previously unfinished - I wonder if it came into contact w/ something, (overspray from some form of chemical, fertilizer, miracle-gro, etc), that prevented the stain from absorbing in those spots? Regardless of the how, I'll agree w/ the prevailing wisdom to sand it all down to bare wood and try again - maybe w/ a brush this time, for the first coat at least, to see if those spots still reject the finish. Hopefully whatever it was didn't penetrate too deep. If that produces the same results - as much as I hate to suggest it for walnut - an oil based primer and paint?
 

kooshball

David
Corporate Member
I’m not sure if it would help but if you are sanding it back down, you might want to give it a coat of boiled linseed oil, then when dry, top coat it. I have done this for interior walnut and it works well…not sure if it is appropriate for outside though.
 

John Gerken

New User
John
Thanks, guys. When it was new (many years ago) it had some sort of clear protective finish on it. But when I retrieved it from my mother's house, it was in rough shape and had what looked like some sort of lichen on it. I didn't treat it with anything. I just scraped the yuck off and went after it with a random orbital sander starting at 120 grit followed by 240. I suppose it's possible that something got sprayed on it. Maybe during a lawn treatment or something?

Anyway, the plan is:
  1. Buy a small can of Spar Urethane
  2. Sand it back down with 240
  3. Apply at least one coat with a brush (for this sort of finish, what sort of brush is best?)
  4. If it takes, continue with more coats. If not, reassess.
Thanks again for all the feedback. I greatly appreciate it. This is going to be a gift for my sister, so I want it to look as good as possible and have a durable finish.

John
 

Craptastic

Matt
Corporate Member
Make sure you raise the grain with a light spritzing of water before each sanding and then allow to dry completely before coating. It makes for much better results.
 

John Gerken

New User
John
Make sure you raise the grain with a light spritzing of water before each sanding and then allow to dry completely before coating. It makes for much better results.
Hi Matt,

Please help me understand. Are you referring to the period during which I'm applying the urethane? If so, after I've sanded all of the existing finish off to start again, where should the spritz occur?

Thanks,
John
 

Warped Woodwerks

.
Senior User
Interesting.

I bought a can of Spar Urethane, not a spray version.

I used a nice paint brush and put 3 coats on my project (cedar planter). It is recommended to use only a light layer each time, so pooling doesn't occur. Not sure if pooling happened for you, with that can.

Anyways.. like others have mentioned, sand your project (maybe to a raw surface), use a spray bottle and gently mist your wood with water, so the grain raises, then sand. Use a tack cloth and remove the saw dust, then apply 1st coat. Pay attention not to over use the Spar. otherwise, when it dries, you will have areas that pool, making your finish not so desirable.


Best.
 

Roy G

Roy
Senior User
Are you sure the wood is walnut? First picture shows some pores in the wood, not like walnut. And the reddish color is not like walnut. You might have some sort of tropical wood that has a lot of oil in it. Finish wouldn't stick to oil.

Roy G
 

John Gerken

New User
John
Are you sure the wood is walnut? First picture shows some pores in the wood, not like walnut. And the reddish color is not like walnut. You might have some sort of tropical wood that has a lot of oil in it. Finish wouldn't stick to oil.

Roy G
Interesting thought. I'm certainly no expert, so I could be wrong. Given it's from a common windchime, though, I'd be highly surprised if it was anything exotic. I suppose I could take it to my local woodworking store and compare it with what they have there.
 

Craptastic

Matt
Corporate Member
Hi Matt,

Please help me understand. Are you referring to the period during which I'm applying the urethane? If so, after I've sanded all of the existing finish off to start again, where should the spritz occur?

Thanks,
John

After rough sanding to remove the current urethane coating you will need to bring the finish back up to something much more smooth than the whatever grit you used to remove the old finish.As you are progressively moving to finer grits, after finish removal and before applying urethane, is when you should mist some water on. It raises the grain slightly and lets you get to a finer wood surface that will take on the new finish much more evenly. So bring it to 100 grit smooth and then spritz some water on it and after a minute or so bring it to 150 grit smooth, then spritz some water on it and then bring it to 200 grit smooth, etc, til you have it to the smoothness you want.
 

John Gerken

New User
John
After rough sanding to remove the current urethane coating you will need to bring the finish back up to something much more smooth than the whatever grit you used to remove the old finish.As you are progressively moving to finer grits, after finish removal and before applying urethane, is when you should mist some water on. It raises the grain slightly and lets you get to a finer wood surface that will take on the new finish much more evenly. So bring it to 100 grit smooth and then spritz some water on it and after a minute or so bring it to 150 grit smooth, then spritz some water on it and then bring it to 200 grit smooth, etc, til you have it to the smoothness you want.
Thanks for clarifying, Matt. Cross your fingers that it takes the urethane this time.
...John
 

smallboat

smallboat
Corporate Member
Interesting thought. I'm certainly no expert, so I could be wrong. Given it's from a common windchime, though, I'd be highly surprised if it was anything exotic. I suppose I could take it to my local woodworking store and compare it with what they have there.
Tropical does not always equal exotic. Most of the products that are imported are made in places where walnut would be considered exotic.
I agree it’s probably some common tropical wood. Makes sense that they would use a wood that’s easy to find, inexpensive, and durable in an outdoor application.

unless the wind chimes were manufactured by a local craftsperson.

If oils in the wood are the culprit, a coat of shellac will seal it. or epoxy if you want to go all in. then you can follow with the spar.

be sure to finish both top and bottom with the same process.
 

Gofor

Mark
Corporate Member
The disbonding occurring close to cracks, etc leads me to believe you have some chemical contamination that has been absorbed into the cracks and maybe some other sections. Could be bug/wasp spray, etc. After sanding down, I would wet wipe it with a solvent (mineral spirits, DNA, naptha, etc) and then wipe the solvent off with clean cloths. Then let it thoroughly dry to get the solvent out of the cracks.

Recoat as you wish based on the above comments. If you go with the Helmsman, apply light coats (but enough to fully wet the surface) and then let it dry long enough for all the propellant to off-gas. Follow the directions on the can as to drying times, but realize they are for 70 degrees and 50% humidity. With the cooler weather, double the drying time for every 10 degrees below 70.
 

John Gerken

New User
John
Really good comments and feedback, guys. I'll wet wipe for sure. If I use shellac to seal it, will I still get the dark color that I get with the straight urethane?

One other data point. Compare the picture below with the one I posted at the top of this thread. I sanded it down this morning and it looks like the trouble areas are what appears to be a knot and/or dark parts of the grain. Strangely, though, I don't see anything like that on the other side. If it is a knot or similar aberration in the wood, is there something different I should do to account for it before trying the shellac? Or, is this perhaps evidence of the contamination that some of you have mentioned? If it's contamination, should I continue to sand through it, or is the shellac the right approach? (I've not tried epoxy before)

Thanks again,
...John

IMG_8173.jpeg

https://photos.google.com/photo/AF1QipOZery8HjWvlTCzOZ2bxe3MxtXSSuDpmKq0OesY
 

Gofor

Mark
Corporate Member
Not saying what you should do. Based on the picture, I would suspect that the light flaky looking areas will still show after recoat at this point. Instead of sanding those areas, I would take a card scraper to work one of them, and if that removes it, continue on to do the others. If not, I would put this side up to where it would least be seen when the chimes are installed.

You could also just try a dab of shellac on one to see if the whitish color disappears. If it does, go ahead and rub shellac into the whole surface. If things still aren't right, the shellac can be removed with alcohol.
 

John Gerken

New User
John
Hi all. I just wanted to give you a quick update and "thank you." You guys were correct, it appears that the wood was contaminated in some way. I ended up sanding about 1/16" off but finally got to the point where the contamination reduced to the point that the Spar Urethane would adhere in a uniform way across the surface. Also, as you suggested, I switched to using the brush instead of the spray and that applied a much thicker coating, which seemed to help. I thought it was fascinating the way the urethane would self-level so that the brush lines would disappear. I didn't expect that. Lastly, I did have some difficulty dealing with dripping down the sides, so my solution was to sand back the drips and then use the spray for the final coat. I think that it came out well.

Thank you all!
 

Attachments

  • IMG_8178.jpeg
    IMG_8178.jpeg
    1.9 MB · Views: 45
  • IMG_8490.jpeg
    IMG_8490.jpeg
    2 MB · Views: 47

Premier Sponsor

Our Sponsors

LATEST FOR SALE LISTINGS

Top