I keep flip-flopping between both of these methods and want some opinions which is better/safer.
FIRST -

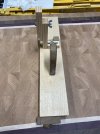
Keep moving the board to the fence for each cut, obviously use push stick to get the slat past the blade. I know that it’s better for the off cut not to be between the blade and the fence but this setup doesn’t move the fence and the cuts are consistent.
or SECOND -

Position the guide for the desired thickness and move the board and fence for each subsequent cut.
Thanks for any comments and advice
—Claus
FIRST -
Keep moving the board to the fence for each cut, obviously use push stick to get the slat past the blade. I know that it’s better for the off cut not to be between the blade and the fence but this setup doesn’t move the fence and the cuts are consistent.
or SECOND -
Position the guide for the desired thickness and move the board and fence for each subsequent cut.
Thanks for any comments and advice
—Claus