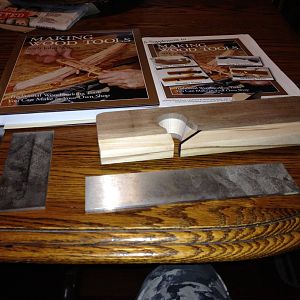
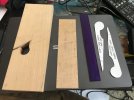
Thought I would make a thread to post some of the progress shots from the rabbet plane I am making. It's a 3/4" rabbet plane with the iron bedded straight, I'm mostly following Caleb James' plans. It is bedded at 55* which I am suspecting is going to be a little bit much for aggressive cutting but we will see. I think 50 degrees was more common historically. The wood is quartersawn hard maple. No boxing on this one.
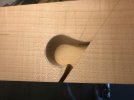
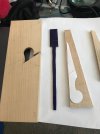
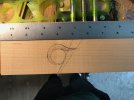
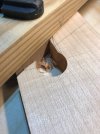
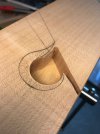
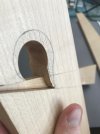
The blank gets squared up and marked out first. The escapement is drilled with a forstner bit, then I saw the bed and breast lines using a sawing guide. The wear angle and the bed are then pared with a chisel using a guide clamped to the blank. I used the drill press jig from this thread to drill out the mortise. At that point I got some wedge stock ready and cut it into two wedge blanks. The less clear half becomes the temporary wedge, which has a 10* angle and is used for fitting, and then will also serve to back up the escapement when I start carving it (since otherwise it could break out where the wedge mortise is.) So it will get marked up pretty badly, in fact I may chop off the end so I can pare clean from one side of the blank to the other.
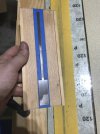
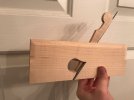
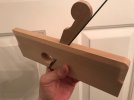
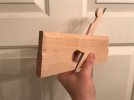
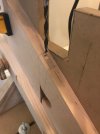
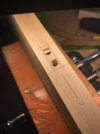
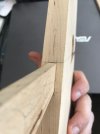
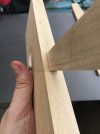
Today's progress was floating the mortise and getting the temporary wedge fit. I don't know how long that took, probably easily 2-3 hours, but it is the first mortise I have floated. I will admit I "cheated" a little, I was gifted some Iwasaki floats for my birthday. I still haven't woken up one day and decided I wanted to file 40 teeth into the side float blank I started, so for this one I just used the Iwasaki float for the sides. I'm not sure yet if the Iwasaki side float is long enough for side escapement planes but they worked for this one.
There is a slight gap on the sides (1/64 or something) where the wedge emerges into the escapement that allows it to wiggle from the pointed end, but it doesn't wiggle from the actual top side so I am hoping that is sufficient for now.
The big parts that remain are carving the conical escapement and making + hardening the iron. After that it is just doing the chamfers and gouge cuts and flattening the sole on glass.
The blank gets squared up and marked out first. The escapement is drilled with a forstner bit, then I saw the bed and breast lines using a sawing guide. The wear angle and the bed are then pared with a chisel using a guide clamped to the blank. I used the drill press jig from this thread to drill out the mortise. At that point I got some wedge stock ready and cut it into two wedge blanks. The less clear half becomes the temporary wedge, which has a 10* angle and is used for fitting, and then will also serve to back up the escapement when I start carving it (since otherwise it could break out where the wedge mortise is.) So it will get marked up pretty badly, in fact I may chop off the end so I can pare clean from one side of the blank to the other.
Today's progress was floating the mortise and getting the temporary wedge fit. I don't know how long that took, probably easily 2-3 hours, but it is the first mortise I have floated. I will admit I "cheated" a little, I was gifted some Iwasaki floats for my birthday. I still haven't woken up one day and decided I wanted to file 40 teeth into the side float blank I started, so for this one I just used the Iwasaki float for the sides. I'm not sure yet if the Iwasaki side float is long enough for side escapement planes but they worked for this one.
There is a slight gap on the sides (1/64 or something) where the wedge emerges into the escapement that allows it to wiggle from the pointed end, but it doesn't wiggle from the actual top side so I am hoping that is sufficient for now.
The big parts that remain are carving the conical escapement and making + hardening the iron. After that it is just doing the chamfers and gouge cuts and flattening the sole on glass.
Attachments
-
 IMG_1148.jpeg1.9 MB · Views: 149
 -
 IMG_1153.jpeg1.8 MB · Views: 148
 -
 IMG_1159.jpeg1.5 MB · Views: 153
 -
 IMG_1180 (1).jpeg1.5 MB · Views: 136
 -
 IMG_1183 (1).jpeg1.4 MB · Views: 141
 -
 IMG_1181 (1).jpeg1.6 MB · Views: 147
 -
 IMG_1207.jpeg1.7 MB · Views: 146
 -
 IMG_1228.jpeg1.4 MB · Views: 149
 -
 IMG_1229.jpeg1.3 MB · Views: 140
 -
 IMG_1230.jpeg1.4 MB · Views: 141
 -
 IMG_1231.jpeg1.3 MB · Views: 154
Last edited: