JoeWoodworker Vacuum Press?

Status
Not open for further replies.

michaelgarner

New User
Michael
I was going to build one before I found out that I was going to be stationed over seas again. But I was on that site and saw a couple of our members from NCWW there. You have to look close at the pics and kinda know their shop a bit. I am sure they will chime in.
 

woodnick

New User
Nick
Here's a picture of mine. Work's GREAT:eusa_danc:eusa_clap
 

Attachments

  • vacuum 002.JPG
    vacuum 002.JPG
    40.6 KB · Views: 221
  • vacuum 001.JPG
    vacuum 001.JPG
    37.5 KB · Views: 212

mshel

New User
Michael Shelley
Jermey,

Here are a couple of pics of mine. I built it using a pump I picked up a a garage sale but bought most of the fittings, controls from Joe. Works like a champ but I have a slow leak I haven't been able to identify as yet. I believe counting the pump, bag and stuff, I have around $400 in mine. It is not hard to build, just got to follow the instructions posted on his site.

DSCF00112.JPG


DSCF00093.JPG


DSCF00084.JPG


Mike
 

junquecol

Bruce
Senior User
Mike, with that pump you didn't need a tank. Your pump will pull 6 CFM, continuious duty. You only needed a check valve, filter, and vac. switch. Jeremy, if you are looking at the venturi route, check out Air-Vac Enginering. I think correct number for venturi is AH-93. Less than $25. I'm looking at mounting a pump similar to Mikes on a twenty five gallon verticle tank in the upstairs of my shop. Run vacumm lines, just like air lines. A fellow Woodworker in Cary just built a Joe Woodworker system, using a surplus vacumm pump from hospital. SWEET!
 

dino drosas

Dino
Corporate Member
Here's my version. I chose the larger size Venturi style pump and upgraded the tanks from 3" to 4" and kept it very simple. Joe's instructions are very clear and make it very easy to build and it really does SUCK.
 

Attachments

  • vac press.jpg
    vac press.jpg
    62.1 KB · Views: 226

Bernhard

Bernhard
User
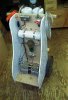
Yup, I also built one based on Joe Woodworker. I made some changes: I used a 7 gal portable air tank as a vacuum reservoir. That way, all the air gets evacuated from the bag almost instantanously and there is less chance of movement of the glued parts.
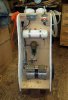
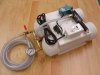
Also, I got a pretty large, continous duty, high- vac pump from our lab (rough pump from a mass spectrometer)...it will suck the chrome off a bumper hitch. With the continuous duty, rotatary vane pumps, there is no need to have a vacuum beak before restart, you start start the pump, that's it. They are disigned to run 24/7. Only draw back is the you have to change the oil every now and then (once a year?) since all the volatiles from glue, etc are pulled through the oil.
If interested in a pump, I'll check if we have any left. If you have 3-phase power, I have an extra one.

Cheers,
Bernhard
 

DavidF

New User
David
How does the cost of building one ($400) compare with buying the complete thing? I seem to remember seeing a commercial one on sale at the Klingspor show last year for something in the $300 range. Vacu press I think.
 

mshel

New User
Michael Shelley
How does the cost of building one ($400) compare with buying the complete thing? I seem to remember seeing a commercial one on sale at the Klingspor show last year for something in the $300 range. Vacu press I think.

David,

Did that price include the bag and such? My bag which was inlcuded in that price I posted is 4' x 8' and made of heavy gauge vinyl.

Junquecol,

Yea, I know I didn't need to put a reservior on the system but figured it couldn't hurt. All I know is it pulls down in less than a minute and even with the small leak, it never runs for more than 45 - 50 sec. each time it kicks on.


Mike
 

4yanks

New User
Willie
I'd love to build one of those. I would like to begin working with veneer to satisfy my William and Mary fascination. I love making my own tools. I like tinkering with machinery. That project has it all.
 

WoodWrangler

New User
Jeremy
Thanks for all of the good feedback. I think I'm going to take on this project in the next month or two.

Is there a cheaper way to get the material for the bags? They are expensive!
 

DavidF

New User
David
David,

Did that price include the bag and such? My bag which was inlcuded in that price I posted is 4' x 8' and made of heavy gauge vinyl.

Junquecol,

Yea, I know I didn't need to put a reservior on the system but figured it couldn't hurt. All I know is it pulls down in less than a minute and even with the small leak, it never runs for more than 45 - 50 sec. each time it kicks on.


Mike

They have a 49 x 49 20mil bag with the kit and I assume it is the 1cfm pump for about $360. The heavier duty 30 mil bags soon wack the price up. They call it a "hobby kit" and for the once a year use I might give it, it will probably do the trick.
 

woodnick

New User
Nick
Try a place that does boat work, they may have some small pieces that are too small to use on a boat!
 

junquecol

Bruce
Senior User
Thanks for all of the good feedback. I think I'm going to take on this project in the next month or two.

Is there a cheaper way to get the material for the bags? They are expensive!
Wal-Mart stocks vinyl in 54" widths in the fabric section. Joe used to have a section on building your own bag, I assume he still does. For flat work, a frame press is the way to go. It is a platten that is on top of a torsion box, and a frame that comes down over it. The frame has the bag material on it. Large Glad Storage bags will work for single use. Unfortunately, "Space Bags " don't. Another source of vinyl is an old waterbed mattress. One company makes a bag that has built in seal, just like Zip Lock bags. Googen Brothers used to have a manual on vacumm pressing fiberglass boat hulls.
 

Gofor

Mark
Corporate Member
For a flat piece, all you need is a non-porous surface, plastic sheeting, and some way to seal the edge between the plastic and the surface. Plastic packing tape works fine if you squeezee out the seal.
You can make your own bags out of thick mil plastic (about $44 for 10' wide by 100' long at Lowes) and adhesive caulk. Fold it double and seal the edges.
When you put the vacuum on it, seal any leaks with a piece of saran wrap or bubble gum will work for an odd shape. The vacuum will hold it tight.

Go
 
Status
Not open for further replies.

Premier Sponsor

Our Sponsors

LATEST FOR SALE LISTINGS

Top