Harvest draw leaf table

Status
Not open for further replies.

DSWalker

David
Corporate Member
My next project is a white oak harvest table for my sister with draw leafs similar to the video below. She doesn't want breadboard ends on the table itself, but the leafs will be perpendicular when extended.

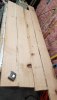
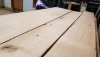
The oak is rift and quartersawn with some really nice rays. The boards will finish out to about 1.25" thick and avg 6-8" in width. Table will be about 3.5' wide and 5' long. The draw leafs will be an additional 12" each for a total length of 7' when extended. Samples of the wood below. This is lumber milled from the family farm a couple years ago. Will need some epoxy.


  • Any concerns with the top cupping without the BB ends? It has been acclimating in the climate controlled shop for about a month. MC below 10%
  • She wants a small 'V' groove at the glued seams. Not sure how that will look w/o BB ends. Any thoughts, Photos of past projects? Was thinking about some dark stain on the ends b-4 glue up to make the seam stand out instead of the V groove. Would the stain impact the glue up?
  • Epoxy suggestions?


I'm sure I"ll have more questions as I go along. Feel free to throw out any thoughts or ideas you have. My biggest challenge right now is running the 6' boards through the jointer and keeping it straight.

TIA


https://www.youtube.com/watch?v=x2H0AVboUP0

attachment.php
attachment.php
 

Attachments

  • harvest table.jpg
    harvest table.jpg
    377 KB · Views: 329
  • harvest t.jpg
    harvest t.jpg
    359.5 KB · Views: 299

KenOfCary

Ken
Staff member
Corporate Member
Stain might affect the glue more than a dye would. For that reason, I'd lean towards dye for this application. Just my initial thought.
 

Jeff

New User
Jeff
That's going to be a fun project, in particular, designing the 2 sets of bypassing runners with the correct taper to raise the leaves to the fixed table top height.

Is the fixed table top going to be 1.25" t or maybe 7/8"?

This Tommy Mac video is helpful, but some key specifics are glossed over at about 22 min. "Oh, that's really simple, zippity-do-dad, voila!".

https://www.youtube.com/watch?v=T9_S-nR1_is

1. At 42" w, keeping the table top flat is risky business but not using breadboard ends isn't a show stopper either.

2. The v-grooves seem inappropriate for a dining table where food and spills can accumulate (hard to clean too).

3. West System epoxy (105 resin, 206 hardener, with metered pumps for dispensing) is excellent but there are several other good ones that others use.
 

Attachments

  • User Manual 2012 Part1.pdf
    564.8 KB · Views: 170
Last edited:

Chilihead

New User
Chilihead
Looks like there are 2 battens underneath the top in the Youtube design. I suspect they perform double duty in helping guide the leaves as well as helping to hold the table flat.
I just made a qtr sawn red oak counter top and filled a lot of voids with epoxy. If the void goes all the way through, then make sure to put a packing tape on the underside to keep the epoxy from spilling out. I used a 5 minute epoxy initially to seal the bottom of the void quickly, and then used Clear Cote epoxy after that (Clear Cote is similar to West Systems but they don't offer the measured pumping system. I wished I'd had that!) You don't want to use the quick setting stuff for the entire void. It sets up too quickly which traps air bubbles and it is not viscous enough to fill all cracks.

Good luck!
 

DSWalker

David
Corporate Member
That's going to be a fun project, in particular, designing the 2 sets of bypassing runners with the correct taper to raise the leaves to the fixed table top height.

Is the fixed table top going to be 1.25" t or maybe 7/8"?

This Tommy Mac video is helpful, but some key specifics are glossed over at about 22 min. "Oh, that's really simple, zippity-do-dad, voila!".

https://www.youtube.com/watch?v=T9_S-nR1_is

1. At 42" w, keeping the table top flat is risky business but not using breadboard ends isn't a show stopper either.

2. The v-grooves seem inappropriate for a dining table where food and spills can accumulate (hard to clean too).

3. West System epoxy (105 resin, 206 hardener, with metered pumps for dispensing) is excellent but there are several other good ones that others use.

I remeasured the boards and they are actually a little under 1.25 now, so after another pass or 2 thru the planer will be closer to 1". So it will appear to be a 2" top with the extensions sitting underneath.

The video you provided is actually the one I found initially. It is saved in my favorites. I just posted the other cause it's a LOT shorter. lol I agree, the sliders and tapers are going to be the biggest challenge. I posted about this build 6-8 months ago and got some good suggestions. I'll be going back to that post and reviewing as well.

We discussed the 'V' grooves last weekend at our TN Christmas family get-to-gather. I may try the stain, or gel as Ken suggested, on some cut-offs and see how they look. I just can't see the grooves either w/o the BB ends. We talked about the crumbs that will gather in the grooves. :)

Is there a shelf life on the West systems epoxy after the first use?
 

smallboat

smallboat
Corporate Member
West epoxy has a shelf life measured in years when stored in the original containers. Wise to make sure the pumps are fully primed after a long rest. Otherwise should be good to go.
 

Jeff

New User
Jeff
Is there a shelf life on the West systems epoxy after the first use?

No, it's a 2 part epoxy (resin and hardener) whose individual shelf lives are pretty long. That's all in the West System booklet that I attached.

Once the 2 components are mixed the curing reaction begins and you'll generally have about 20-30 minutes of good working time so, in general, mix small batches at a time.

BTW, I was also curious about your post on the table subject and feedback but can't find it during the last 12 months.

Edit: Found it, September, 2016 (+1 year ago). You, Dave Richards, and me were the only players in that game at the time.
 
Last edited:

Dave Richards

Dave
Senior User
I've had excellent results with epoxy from Raka. I like their mix ratio and prices. I used their epoxy when I built the sailboat and it's my "go to" adhesive for many things.

Wipe the oak down with white vinegar before before applying the epoxy. And don't mix large quantities of epoxy in a batch. It's exothermic and the container can get really hot if you have a large quantity. Plastic containers like yogurt containers are just the ticket for mixing. Leave the extra epoxy to cure and you can pop it out because it won't stick to the plastic.
 

DSWalker

David
Corporate Member
BTW, I was also curious about your post on the table subject and feedback but can't find it during the last 12 months.

Edit: Found it, September, 2016 (+1 year ago). You, Dave Richards, and me were the only players in that game at the time.

Been talking about this for a while now... running out of excuses with my sister! lol Wood... Dry. Shop... finished. No more excuses. Time to make it happen.
 

Dave Richards

Dave
Senior User
What is the reason for using vinegar? Cleaning? Any concern with vinegar turning the wood grey or does that only happen if the vinegar has the steel wool mix.

The thing I got from The WoodenBoat Forum back when I was building my boat is that the vinegar takes away some oxidation that occurs on the surface if the wood isn't freshly cut/sanded. It only takes wiping it down. Don't saturate. Don't put steel wool or other iron in the vinegar because that will color the wood.

Vinegar is also helpful in cleaning up epoxy before it is cured.
 

Jeff

New User
Jeff
I'm curious once again about something new to me...

The thing I got from The WoodenBoat Forum back when I was building my boat is that the vinegar takes away some oxidation that occurs on the surface if the wood isn't freshly cut/sanded.

How is that oxidation bad for boat building and why is that cleaning step necessary in this case? I think the OP was going to use epoxy for knot/crack filling (mostly cosmetic, not structural). :confused:
 

Dave Richards

Dave
Senior User
The oxidation affects the bonding ability of the epoxy. That would be very important in boat building.

I always wiped the surfaces when epoxying oak and never had a problem. I guess the OP can ignore it if he wishes.
 

DSWalker

David
Corporate Member
The oxidation affects the bonding ability of the epoxy. That would be very important in boat building.

I always wiped the surfaces when epoxying oak and never had a problem. I guess the OP can ignore it if he wishes.

This suggestion actually gave me another idea that might help resolve the "V" groove question I had. If I use some vinegar and steel wool on the edges before gluing up, the darker edges could give her the 'look' she wants to distinguish between the boards w/o cutting the edges/grooves. I'm going to try this on a few of the cut offs and send her some photos.

Just goes to show there are no bad comments/suggestions.
 

Dave Richards

Dave
Senior User
You might also consider adding some powdered carbon (lamp black) to the epoxy.

There's an important thing about epoxy for gluing. Wet the surfaces with epoxy first. Then add a little more. and don't apply too much pressure when clamping up.
 

Rwe2156

DrBob
Senior User
You shouldn't have much concern about cupping with QS material that is well seasoned. That being said, I just about always put bb ends on tables, even with battens, just because you never know what wood is going to do + I think it looks better.

I would not do the grooves. You have to keep debris cleaned out, and seems to me in the long run just provides a place for liquids to get down into a joint.

I use West. Unthickened & usually tinted for filling voids (I use artist acrylic paint), and for joints it must be thickened with either wood flour or the West thickening powder.

Staining QSWO it is not always that straightforward for me, the most foolproof is Danish oil (Dk Walnut shows figure well) followed with a poly top coat. There is an excellent video on staining QSWO easily found with a search.

You may also want to look into grain filling, especially with swirly grain around a knot. This is also another consideration when staining.

Good luck with your project!
 
Status
Not open for further replies.

Premier Sponsor

Our Sponsors

LATEST FOR SALE LISTINGS

Top