In my post above I commented that I use a router instead of an expense domino machine.
@Rwe2156 commented "I would never attempt a mortise with a hand held router, jig or not!!. Not sure if he thought I was crazy, or if he just didn't understand how it works...so I thought I would explain.
I was working on a similar task today, so I took some pictures to help explain in better detail. The pictures are of mortise and tenon type construction, but it's the same thing, only different size and depth. Basically, I make a cut-out on a flat sheet of plywood sized for whatever guide bushing works with the router bit. In this case it's a 9/16 x 1 3/16" cut-out. I'm using a 1/4" spiral bit with a 7/16" OD bushing. The plywood sheet needs to be just big enough so the routing sits flat and there is room for clamps.
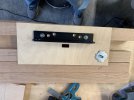
Picture 1 shows the guide angle attached to the bottom of the template...and the guide bushing loose.
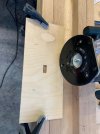
Picture 2 shows the template clamped to the work piece. You'll need to create a nice flat even surface around your work piece so the template sits flat.
Picture 3 shows how the template cut-out is centered around the cut-out drawing on the work piece.
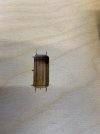
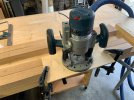
Picture 4 shows the router in place making the cut-out. I had to go 7/8" deep, so I did it in 3 steps. In this case I couldn't take very deep cuts since the cut-out was so small it would fill with the wood chips. When using the guide bushing, it blocks the top exit so there is no place for the chips to go. So between each depth stop, I have to vacuum out the chips, otherwise they will build up and cause problems.
Definitely not as efficient as the domino maker. However, I don't do this that often, so I'm not going to fork-out the money they get for a domino machine. I would rather spend $1200+ on a decent drill press...or a kegerator and a new iPad. ; )