Thanks for the kind comments.
Please note that the entire project is NOT built with solid red oak. The frame members and drawer fronts are solid. The panels are 3/4 red oak ply (exterior) and birch ply (interior). The reason I built the cabinet was because I got tired of searching for bits, router wrenches, allen wrenches in different places and the 4 legged stand was not as heavy as I would like. I also had a HUGE stockpile of oak/birch ply and hardwood cutoffs that I wanted to use to clear up some space in the shop.
The plan is based on a Norm design which my friend built but ALLof the dimensions are different so as to fit the Benchdog table/apron dimensions and working height and space requirements. I basically measured the front dimensions of my friend's cabinet to get an idea of the ratios, since I liked the appearance then began with the outer carcass. I used pocket screw asembly on the carcass, since the loads are primarily vertical and carried by the ply frame. The interior horizontal panels use dados (side panel joints) and pocket screws for the back panel joints.
I used finish nails on the face frames. That was a mistake! Hindsight says it would have taken less time to pocket screw or biscuit the face frames, since I spent over an hour covering up and blending in the nail holes. Typical of what happens when I attempt to shortcut! :eusa_doh: :eusa_doh: I used finish nails to attach the upper 3 1/2 inch oak to the existing router table apron. This had to be done in order to allow access to the apron in the event I replace the router table, which is assembled by the Benchdog instructions.
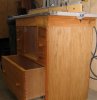
I made the large drawer out of 3/4 birch ply. First time I dovetailed a 12 inch drawer side using plywood. Don't think I'll do it again. Major PITA. Next time, 5/8 oak or poplar will be used. I am glad I used Accuride slides instead of wooden slides. Mounting and centering the drawer only took a few minutes.
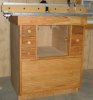
I added a 4 inch port to the rear of the center panel. The plexiglass door (which I carefully measured so I didn't cut short :-D ) is mounted on hinges on the LHS with a magnet stop on the right. I left about 1/8 inch around all sides for air movement. There is a 2 inch collection at the fence. I believe I will have to experiment with air balance to ensure the primary fence location does the bulk of the work. I'm hoping the port at the rear will make the cabinet at negative pressure to prevent undesired dust collection in the cabinet drawers.
My emphasis on this project was toward function, not looks. However, I can tell you the pics don't do justice to the appearance. It looks very good. Given the amount of time I spent coming up with design dimensions and fitting the interior panels, I could have saved a lot of time buying a plan that gave me the dimensions, and building the table from scratch. But, since I had money invested in the table/fence, which are quite good, my approach was probably the correct one.
I am locating a start/stop switch from discard electrical equipment at my workplace. I will either use a compact contactor (motor starter) with momentary start/stop pushbutton or a simple mushroom style if I can find one rated for 18-20 amp motor use. I want the ability to hit the stop with my thigh while holding the workpiece.

")