Stanley #4 Gloat

Status
Not open for further replies.

Steve W

New User
Steve
After picking up some "new" tools at the M-WTCA yesterday, my wife and I went to downtown Mebane to hang out for a while.
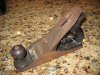
I found this in one of the antique shops for $5!

The rust is only surface rust and should clean off easily. The iron still has the factory edge and the Bakelite adjuster tells me it's approximately from the WWII era -- possibly immediately after due to the frog adjusting screw being present. Nearly all of the Japanning is there and the knob & tote are perfect!

Not a bad find for $5.:eusa_clap

Steve
 

Attachments

  • Stanley #4.jpg
    Stanley #4.jpg
    81.4 KB · Views: 176

sapwood

New User
Roger
Cool Steve!
The japanning, tote and handle appear to be in great condition . . . and for $5 8-O

YOU SUCK!

We look forward to pixs of your progress :icon_thum
Roger
 

Steve W

New User
Steve
Roger, thanks for my first "You Suck!" :rolf:

I've got most of the rust off it and am just taking a little break before going back out to work on it some more. The Japanning looks like it's 100% there now that I have it all apart.
Some Flitz and a Dremel are helping me to get it presentable, and I've started to flatten the sole -- I intend to make this a decent user, as it isn't a rare type.
More pics will be forthcoming...
 

nelsone

New User
Ed
Good looking user. Once you get it cleaned up, it'll look great!

Did you find out anything about the benches?
 

Ozzie-x

New User
Randy
Steve, Nice score on the #4. A lot of folks prefer those type 17's as users because of the heavier castings. I've had several type 17's in the shop and it's not just armchair quarterback talk, they actually do slick up to make nice planes. It was nice meeting you and Nelsone yesterday, and always a pleasure to see Tarhead also.
 

froglips

New User
Jim Campbell
Great find! Can't go wrong for $5 or $10 or $100 or $1000........ Tools, Tools and more TOOOOOLLLLSSSS!

This also proves that going to the MWTCA is not enough to take the EDGE off desire for more... TOOLS!!

Jim
 

Steve W

New User
Steve
One can never have too many tools!

I put it down around suppertime but have to spend more time on it. The sole really has some variability in it -- only a couple of thousandths, but unfortunately most of it is in front of the mouth. I've been running it on the belt sander to get it to a starting point before using the granite and sandpaper for the final. I don't want to go too nuts on it but would like to see what I can do with it within reason.
The lever cap cleaned up fairly well, but will never be the original shiny nickel. That's okay, it looks cool. The iron has rust at the top but the business end is in great shape.
I have a nice 4C already but this one I will set up differently once it's done.
Anyway, I'll post some pics once I make some visible progress.
It was great seeing everyone yesterday. Ozzie, what do you do to yours to "slick 'em up?"
 

Ozzie-x

New User
Randy
Ozzie, what do you do to yours to "slick 'em up?"

Hello Steve,
This could easily be a book or an entire semester course :roll: . The work required for restoring planes for collectibility is much more stringent than what is necessary for a plane to use. Very short version for a user bench plane is:
  • Replace or repair any broken or missing parts.
  • Remove rust, or most of it anyway, wire wheel for the worst of it then electrolysis if too bad. (Your plane is fine, no electrolysis)
  • I generally refinish the wood on rosewood handled planes. Just wax your type 17 wood since it's colored lacquer hardwood.
  • If the japanning is too bad or too gone on a plane, may want to restore it, gloss black Rustoleum is fine for user planes. (your plane is fine)
  • Smooth all mating surfaces and mating parts, this includes frog-to-base, face of frog, leading edge of back of lever cap, leading edge of chip breaker and face at lever cap intersect, adjuster knob & screw, plane bottom, and plane sides. Bottom and sides don't have to be absolutely positively perfect to a psychotic degree, the wood will never know the difference. Sides perfectly square to the base only an issue if you plan on doing a shooting board for miters or similar tasks, otherwise doesn't matter a lot, mostly a cosmetic thing plus keep rust off your wood.
  • Biggest thing is to get the blade very sharp and adjust everything properly on the plane. Sharp cutter is probably the most important. Sharpen the cutter with your method of choice, and again, there's a point where good enough is truly good enough, usually 2000-4000 grit is plenty for real life woodworking unless you're dealing with contrary wood or grain. I like to make shavings, not worship the sharpening process.
  • Once you've went through the plane, keep wax on the exposed bare metal and the mating surfaces. Plain 'ol Johnson wax is good, make sure you don't use anything with silicone since it will mess up your finishing.
That's the 50 cent version, and I may have over simplified it. Actual work required varies with how good or bad the plane is that you start with, plus I'm sure I've overlooked a lot trying to be fast (I'm at work). As cheap as the common planes are, don't waste a lot of time on dog / rust bucket planes, your time is valuable and for a few dollars more you can start out with a decent plane that doesn't require all that time and work. (Just because you can doesn't mean that you have to, DAMHIKT). :icon_thum
 
Status
Not open for further replies.

Premier Sponsor

Our Sponsors

LATEST FOR SALE LISTINGS

Top