Staked Furniture

Status
Not open for further replies.

David Justice

David
Corporate Member
Started a set of staked furniture today, 4 chairs and a round 40" table. All hand tools directly from The Anarchists Design Book. I will change a few things, but probably not much. I plan on posting pictures here as the build goes along. Hopefully it won't take too long.

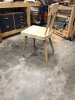
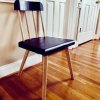
I am using Poplar for the seat and crest of the chairs and painting them with black milk paint. Everything else will be White Oak with only Arm R Seal finish.

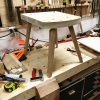
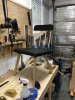
I am building one chair and using it as a model for the other 3. I'll probably glue up the table top sometime while making the chairs.

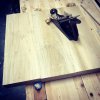
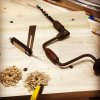
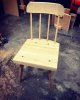
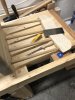
Chair one blank and drilling the mortises.

attachment.php


attachment.php
 

Attachments

  • IMG_2053.jpg
    IMG_2053.jpg
    310.9 KB · Views: 386
  • IMG_2061.jpg
    IMG_2061.jpg
    288.2 KB · Views: 405

Jeff

New User
Jeff
Zoom in on pic #2. I see a few lines and numbers, one of which is a resultant angle of 25 degrees but I can't clearly see the numbers at the top of the pic. How'd you choose the rake & splay numbers for the legs and then determine or calculate the resultant angle from those? I'm curious and the method can be used for all kinds of chairs and stools.
 

David Justice

David
Corporate Member
Hi Jeff,

Christopher Schwarz does a great job of laying it all out in his book 'The Anarchist Design Book'. He also has video called 'No Fear Chair Making' that is great. https://videos.popularwoodworking.com/courses/no-fear-chairmaking

You start out by making a small model of the seat and legs with a small piece of MDF and some stiff wire. Just bend the wires until the rake and splay looks/feels right and record the angles and sight line, then mark on a seat blank. I made a template out of thin MDF since I'm making 4 chairs.

I am simplifying it a bit, but it really is pretty simple. Very little math is involved. I made a sample chair out of 2x4 material just to practice and make sure all of my angles would look good once the chair was built.

This is baby step chair making, these aren't Windsor chairs or anything, but I think it's a great start for anyone interested in getting into chair making, like I was.
 

David Justice

David
Corporate Member
The first chair components are all cut and fitted. I have quite a bit of shaping to do on the seat and crest.

attachment.php


attachment.php


attachment.php
 

Attachments

  • IMG_2074.jpg
    IMG_2074.jpg
    495.4 KB · Views: 289
  • IMG_1454.jpg
    IMG_1454.jpg
    394.8 KB · Views: 294
  • IMG_2084.jpg
    IMG_2084.jpg
    440.8 KB · Views: 306

David Justice

David
Corporate Member
Danny, The legs are octagons. I cut 4 sided tapers on the bandsaw, then cleaned them up and cut the 4 new sides with hand planes.
 

David Justice

David
Corporate Member
First chair is finished and will be a model for the remaining 3, which I will make all at once.


when I turned the spindles, I made the mortises a little too long, so I ended up haveing to use chisel and scraper to taper them down.
attachment.php


attachment.php


I use Arm-r-Seal over the paint and I'm not crazy about the gloss. I am going to re-do with a much flatter top coat and for the remaining chairs. Any suggestions?
attachment.php
 

Attachments

  • IMG_5894.jpg
    IMG_5894.jpg
    290.5 KB · Views: 220
  • IMG_9995.jpg
    IMG_9995.jpg
    454.4 KB · Views: 225
  • IMG_2090.jpg
    IMG_2090.jpg
    506 KB · Views: 375

Graywolf

Board of Directors, President
Richard
Staff member
Corporate Member
Boiled linseed oil, and then pad thin coats of shellac. It's a good coating and you can control the gloss.
 

Jeff

New User
Jeff
Boiled linseed oil, and then pad thin coats of shellac. It's a good coating and you can control the gloss.

Good suggestion, but how about wear and tear on the seat surface from normal rear-end abrasion when seated?
 
Status
Not open for further replies.

Premier Sponsor

Our Sponsors

LATEST FOR SALE LISTINGS

Top