A staircase saw (sometimes called a stair saw) was traditionally used for cutting the slots for the treads and risers into the stringer when building a stair case. There isn't much call for this usage in modern home building. However, I was interested in having a saw I could use to cut dados, including stop dados (a dado that doesn't go all the way across a board). After a brief internet search for ideas I came across an old English staircase saw with an adjustable depth stop. The website provided measurements and very detailed pictures so I decided to have a go at making one.
My version is basically the same dimensions, with some minor variations. I ordered the brass and steel bar stock and with some patience managed to saw and file out all the parts. The screw knobs are made from brass cabinet door hardware.

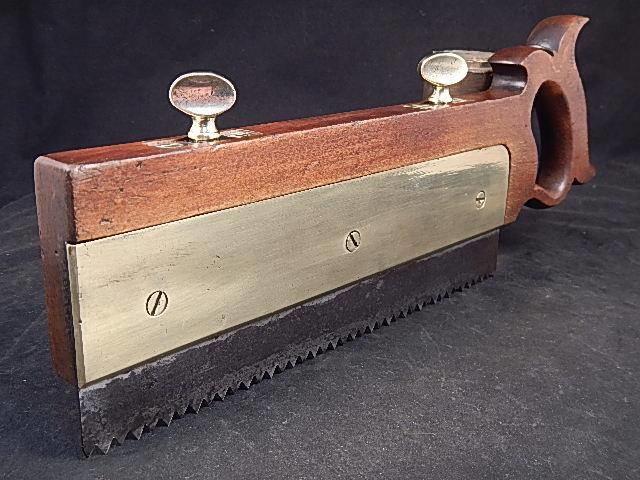
Here's how it looks assembled.


I've made a few practice cuts. The saw definitely has a learning curve. The first surprise is the weight. It's not a light saw. Given mine is a duplicate in materials and size I'm sure this was true of the original as well. The trick is to simply keep it vertical and move the saw back and forth, letting the weight carry it into the wood.
On the first pass I only sharpened the blade and did not set the teeth. Since I wasn't cutting very deep (max depth is 5/8") I wanted to see if having a set was necessary. In the end I decided to give the blade a little set. It makes sawing easier without sacrificing any of the smoothness. I was able to cut to a line without any noticeable tear-out.
I don't believe the original saw was intended for building staircases. The blade is simply too long. At 9" it would exceed the riser on most staircases, making it too long to work. My view is it was created for cutting dados.
I'm already thinking about building a smaller, lighter version to see how it does. I need to spend some more time using this one first, though.
My version is basically the same dimensions, with some minor variations. I ordered the brass and steel bar stock and with some patience managed to saw and file out all the parts. The screw knobs are made from brass cabinet door hardware.
- The saw body is made from purple heart, planed to 7/8" thick. The overall length is about 14". You can find a full set of printable saw handle templates here. I modified one of these slightly to get the handle I wanted.
- It requires two adjustment screws. Each assemble is made from brass bar stock, cabinet door knobs and a 1/4" threaded rod.
- The depth stop has a sole made from 1/4" x 1/2" steel bar stock. The adjusters screw into the vertical brass bars attached to the sole. I dovetailed the brass and steel to match and then peened the brass to fasten it to the steel.
- A 1/8" x 2" brass plate attaches over the blade to act as a stiffener.
- The blade is made from an old handsaw. I kept the 11 TPI from the handsaw, but refiled each tooth so the rake is now 30 degrees. This allows the saw to cut equally well on both the push and pull stroke. This feature was present in many of the antique versions, including the one I was copying. Increasing the rake also gives the saw a smoother cut.
Here's how it looks assembled.
I've made a few practice cuts. The saw definitely has a learning curve. The first surprise is the weight. It's not a light saw. Given mine is a duplicate in materials and size I'm sure this was true of the original as well. The trick is to simply keep it vertical and move the saw back and forth, letting the weight carry it into the wood.
On the first pass I only sharpened the blade and did not set the teeth. Since I wasn't cutting very deep (max depth is 5/8") I wanted to see if having a set was necessary. In the end I decided to give the blade a little set. It makes sawing easier without sacrificing any of the smoothness. I was able to cut to a line without any noticeable tear-out.
I don't believe the original saw was intended for building staircases. The blade is simply too long. At 9" it would exceed the riser on most staircases, making it too long to work. My view is it was created for cutting dados.
I'm already thinking about building a smaller, lighter version to see how it does. I need to spend some more time using this one first, though.