So I have this fan that I liberated from my old heat pump when it was replaced. I'm planning to try spraying finish soon and need a decent fan to ventilate the garage when working inside. I have a little box fan, but this will move a lot more air...and it's got MORE POWER!!!  . I'm getting ready to wire it up for testing before building a box to put it in. I think I've got a handle on the wiring, but though I'd post it here before melting anything.
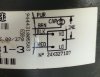
Here is the wiring label from the motor. The colors listed match the wires in the harness, so only one surprise here - this implies a two-speed motor, though only one speed is listed on the other half of the label (800 RPM, IIRC). That isn't the way I expect to see a switch drawn...hmmm...I should try the black/red separately to confirm?

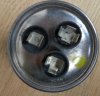
I got a surprise, however, when looking at the capacitor. I'm accustomed to capacitors having two terminals, not three.

They are labeled FAN, C and HERM. FAN and C (common) are obvious enough...but HERM left me scratching my head??? A little googling revealed that would go to the compressor. Ok, so the capacitor has 3 terminals because it serves two purposes? Well, I don't have to worry about the compressor, so I feel like I can ignore that one.
So this now seems pretty straight-forward: Coming from my 240 power cable, ground will go to the fan housing while the two power leads will go to (1) the purple wire and (2) either red or black wire (try each to pick a speed?). The capacitor goes between purple (C) and brown (FAN).
Anyone want to chime in before I set something on fire?
TIA!
Chris
. I'm getting ready to wire it up for testing before building a box to put it in. I think I've got a handle on the wiring, but though I'd post it here before melting anything.Here is the wiring label from the motor. The colors listed match the wires in the harness, so only one surprise here - this implies a two-speed motor, though only one speed is listed on the other half of the label (800 RPM, IIRC). That isn't the way I expect to see a switch drawn...hmmm...I should try the black/red separately to confirm?
I got a surprise, however, when looking at the capacitor. I'm accustomed to capacitors having two terminals, not three.
They are labeled FAN, C and HERM. FAN and C (common) are obvious enough...but HERM left me scratching my head??? A little googling revealed that would go to the compressor. Ok, so the capacitor has 3 terminals because it serves two purposes? Well, I don't have to worry about the compressor, so I feel like I can ignore that one.
So this now seems pretty straight-forward: Coming from my 240 power cable, ground will go to the fan housing while the two power leads will go to (1) the purple wire and (2) either red or black wire (try each to pick a speed?). The capacitor goes between purple (C) and brown (FAN).
Anyone want to chime in before I set something on fire?
TIA!
Chris