Power Feeder Mounting/Install

Jeremy Scuteri

Moderator
Jeremy
I picked up this power feeder at an auction a while back, before the new house and the basement shop build, so this was a few years ago. I finally drilled and tapped the holes in the shaper table and put it in place. I went with 7/16-20 bolts, I could have used 1/2" instead, but I figured a little extra room for alignment error might come in handy.

I drilled 1/8" holes followed by 5/32" holes before the final 25/64" holes for the 7/16-20 tap.

1582682726810.png


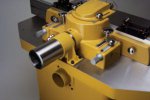
Bolted the mounting bracket to the table using the newly tapped holes.
1582682758475.png


Power feeder in place. My wife helped me lift get it in place. I said "this is the last time I will ask you to help me move this power feeder". It has been moved around a bunch of times.....
1582682858084.png


A little adjustment to put it in place. It has hand wheels for lateral and vertical movement of the head which is nice.
1582682929915.png


1582682942101.png


I need to replace the missing piece that tightens the base to the column. A bolt will work until I find a replacement. The manufacturer replacement part isn't available, but I should be able to find something.
1582682960813.png


The power feeder has forward and reverse with 4 total speeds. I haven't used it yet, I need to take my time to get things setup properly. It will be interesting to see the difference in cut quality compared to what I would get hand feeding on a router table.
https://photos.google.com/u/0/photo/AF1QipMXU1NcVLg5aO623nw2Sgh-ndjd9tzoGQEJWimm
 

Michael Mathews

Michael
Corporate Member
Jeremy, I picked up a misc. box of large T-bolts with heavy shoulders at an estate sale several years ago. If you can post what the bolt length from tip to shoulder needs to be along with the thread size, I'll check the box. Also note if there's a clearance required for the T to clear the frame.

BTW, looks impressive!
 

chris_goris

Chris
Senior User
They take a few minutes to setup, but once you do, youll be amazed at the quality you get from using a powerfeed. I rarely use my shaper without mine anymore. The only thing you have to tweak generally , is your outfeed fence distance relative to the infeed. It needs to be set slightly back. This typically causes some snipe but I never run lengths cut to size anyhow. Where did you get that feeder? It looks like my old one!!. One other tip, replace the drive wheels, they get old and hard and dont grip the wood. Grizzly sells them reasonably.
 
Last edited:

chris_goris

Chris
Senior User
Ive got some extra T bolts at home, Ill see if any of them fit that base. or this:
 

Attachments

  • thandle.PNG
    thandle.PNG
    408.3 KB · Views: 203

blackhawk

Brad
Corporate Member
I've never used a power feeder, but just wondered if they have tapered rollers or a tracking adjustment to be sure that the wood is always pushed against the fence as it is fed.
 

Rwe2156

DrBob
Senior User
Very nice addition. I think every shaper should have one.

Mine isn't as big, I mounted it to a board, which is in turn screwed into inserts in my router table. Only because I'm hoping to come up with a way to use in on the table saw.
 

Jeremy Scuteri

Moderator
Jeremy
Where did you get that feeder? It looks like my old one!!

I got it at an IRS Auction for $275. It's a 220V unit. I figured that was worth it just to check it out. It wasn't too long after your sold yours, that gives you an idea of how long ago this was (and how many times it has been moved around and been in the way). If I remember correctly you switched to a 120V Powermatic?
 

Jeremy Scuteri

Moderator
Jeremy
I've never used a power feeder, but just wondered if they have tapered rollers or a tracking adjustment to be sure that the wood is always pushed against the fence as it is fed.

Like Jack (Skymaster) said above, you angle the power feeder towards the fence (toe-in). That keeps the stock pushed down to the table and against the fence. Even and consistent pressure and feed rate.
 

Willemjm

Willem
Corporate Member
Nice job Jeremy!

Interesting there are no rules for which side of the shaper the power feeder should be mounted. Mine is mounted on the left side on both my shapers.

I use two feather boards to keep things against the fence.
 

chris_goris

Chris
Senior User
I got it at an IRS Auction for $275. It's a 220V unit. I figured that was worth it just to check it out. It wasn't too long after your sold yours, that gives you an idea of how long ago this was (and how many times it has been moved around and been in the way). If I remember correctly you switched to a 120V Powermatic?
Yes mine is a 120v PM 4 roller, 1HP. Those things are horrible to move around!.
 

bob vaughan

Bob Vaughan
Senior User
The placement of that base is probably the best for versatility.
When you can, pick up an extra extension and move the fence 90º. You'll be amazed at the convenience of having that extra length of bed under your stock when doing long work. Also, for convenience, put an auxiliary starter button where it can be easily used with the new fence position. I use my shaper this way 98% of the time. I've also learned that a shop made fence is far superior to the factory fence in many ways. I also use the shop-made fence 98% of the time. Some examples below.

1 shaper mount - 1.jpg

Doing some custom hand rail.

1 shaper mount - 2.jpg

Doing some custom casing out of walnut

1 shaper mount - 3.jpg


Two start-stop stations for convenience.
 

chris_goris

Chris
Senior User
I've also learned that a shop made fence is far superior to the factory fence in many ways. I also use the shop-made fence 98% of the time.
/QUOTE]
Ive found this fence to be very robust and user friendly. the only thing ever have done is add a continuous fence for raising panels.
 

Attachments

  • 3a8ee_1280100C_det3.jpg
    3a8ee_1280100C_det3.jpg
    14.6 KB · Views: 191

Premier Sponsor

Our Sponsors

LATEST FOR SALE LISTINGS

Top