Portable Floor Table Complete

Status
Not open for further replies.

redknife

Chris
Corporate Member
Here is the completed "Floor Table". My daughter helped design the table. It is meant to be used sitting on the floor. Fold up the legs and carry. The legs are held in each position by magnets with a wooden hinged lock to hold them closed. She wanted the style handle as seen.

Thanks for the advice in earlier stages of the project.
attachment.php

attachment.php

attachment.php

attachment.php
 

Attachments

  • b table angle top view.jpg
    b table angle top view.jpg
    223.8 KB · Views: 182
  • B Table Front legs collapsed.jpg
    B Table Front legs collapsed.jpg
    92.3 KB · Views: 179
  • b table bottom legs down.jpg
    b table bottom legs down.jpg
    215.2 KB · Views: 176
  • Closeup leg lock.jpg
    Closeup leg lock.jpg
    194.1 KB · Views: 178

sawman101

Bruce Swanson
Corporate Member
Really great craftsmanship Chris! Beautiful wood, finish and design! It is unique and pleasing to the eye, as well as functional and innovative. Love the leg locking mechanism! Great work on your father/daughter project!:eusa_clap
 

redknife

Chris
Corporate Member
Those are called button fasteners. They fasten securely to the tabletop and float, albeit snuggly, in the mortise. The mortises on the long sides are about the width of the fastener tenon where movement should close and open the gap between the fastener and apron. The tenons were inserted a little more than halfway into the mortise on the sides, allowing for bidirectional movement of the top and erring further in as it is summer. On the sides, the mortises are wider and tenons completely inserted as the wood movement should be lateral. This is just one option to fasten a table top such that you allow for movement where grain is connected off axis.
Here is a picture of the button fastener before rounding:
attachment.php


For the table, the exposed edges of the button fasteners were all rounded because of the persons legs and knees under the table. For a traditional table such as a coffee table I'd leave them squared with broken edges.
To prepare these, I dimensioned the thickness of a board and squared the end. Rabbet across the end of the edge of the end of the board. The depth of the rabbet must be about 1/16" less than the distance from underside table to the closest edge of the mortise. This allows it to snug up. Last, crosscut the board leaving a board-width button fastener then rip each piece to desired width on a tables saw with crosscut sled. The mortises were cut with a mortiser.
 

Attachments

  • Button Fastener.jpg
    Button Fastener.jpg
    152 KB · Views: 84

CDPeters

Master of None
Chris
Very nice Chris! 2 questions if I may - What are the top dimensions and what was your finish schedule?
 

redknife

Chris
Corporate Member
Very nice Chris! 2 questions if I may - What are the top dimensions and what was your finish schedule?
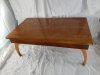
Chris, the top dimensions are 30" x 18" x proud 1/2"

Finish schedule:

Figured Cherry top and Cherry apron: Spray Transtint Dye about 10 ml Brown Mahogany and 4 ml Honey Amber in about 400 mL DNA. Multicoats, some sanding, some hand rubbing with alcohol soaked rag.
4 coats spray Gloss Target EM 8000 Conversion Varnish, sanded after 3rd.
After cure: Hand rub table top Micro-mesh, soapy water 1500-12000. Apron to about 3-4000 for more satin look. Underside top 4-0 steel wool only

Legs:Maple, spray with Honey Amber dye. Way too mustard yellow. Sanded back to faint yellow. Slowly added hand rubbed Mahogony Brown Transtint/DNA. Lots of tweaking by hand sanding, alcohol rubbing or dye rubbing.
4 coats EM 8000. 4-0 Steel Wool only after cure for satin finish.

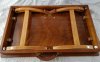
Table Top Fasteners: Superblonde shellac brushed x4, steel wool

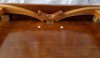
Latch: Hand applied Brown Mahogany/DNA. EM8000 x 4. Steel wool
 
Status
Not open for further replies.

Premier Sponsor

Our Sponsors

LATEST FOR SALE LISTINGS

Top