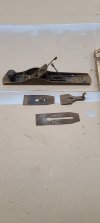
I've got an old Bailey No. 6 that belonged to my great grandfather. I want to use it, but I don't want to destroy the value of a collectable antique. I guess my question is should I clean up these parts and screws or try to replace some of the really rusted ones? I'm more interested in the experience of using the plane than the act of restoring it.

You are using an out of date browser. It may not display this or other websites correctly.
You should upgrade or use an alternative browser.
You should upgrade or use an alternative browser.
Old Plane
- Thread starter waitup
- Start date
Needs a bit o work. Has no collector value as is. I’m getting ready to start up my electrolysis rig. Once I’m sure what I’m doing I would clean your plane for you. It also needs a tote or do you have one for it?
I say, "Good for you" for deciding to restore and use it. These were meant to be used. It's probably not unique enough to be of significant value as a collectable item.
From the picture it looks to be in good condition with only surface rust. Some of the paint is gone. You could strip and repaint, or just clean it and use as is. I've done both. The decision to repaint is more about future protection and won't affect the use.
My goto method for removing rust is electrolysis. I find this works the best of any method I've tried. Post pics when you get it restored.
At a bit of a guess, it looks like you might have a Type 12, dating from around 1920. These are not especially valuable types of planes (think <$100). Find out more about your plane here: How To Identify Stanley Hand Plane Age And Type (Type Study Tool) | Wood And Shop
Clean it up and put it to use. Keep the hardware..some of it isn't made anymore so hard to source replacements.
A bit of light surface rust won't hurt anything, as long as its not on the working surfaces (sole, blade, etc).
Edit to add: a replacement tote (handle) is available as a new part from various specialty sellers or you can make your own, e.g.

 www.goantiques.com
-Mark
Clean it up and put it to use. Keep the hardware..some of it isn't made anymore so hard to source replacements.
A bit of light surface rust won't hurt anything, as long as its not on the working surfaces (sole, blade, etc).
Edit to add: a replacement tote (handle) is available as a new part from various specialty sellers or you can make your own, e.g.
Stanley Plane Tote Handle No. 5, 6, 7, 8 Walnut Finished
This is a rosewood stained and clear finished solid walnut replacement handle/tote that is designed to fit vintage Stanley Bailey type planes No. 4-1/2, 5, 6, 7, 8, and some others as well, like the No.
www.goantiques.com
-Mark
As others have said, the value of this plane is much higher for you as a tool used by your ancestor than for any financial collectable value.
I cannot resolve the picture of the plane well enough to tell if there is a frog adjustment screw or not. That is an indicator of the plane's type and age.
I definitely would not suggest trying to strip the black protective coating and paint it until you find out how you like using it and whether or not the sections of bare metal are aesthetically bothersome to you.
If you have never restored a plane before, you may be surprised that the screws are sizes and threads that are not readily available today. To replace them, you would probably need to find a donor plane.
If you can learn to properly adjust the chipbreaker, you will be amazed at how well that plane works.
When you are cleaning/sharpening the blade, be attentive to pits on the backside. Having a pit on the cutting edge will leave a ridge in your wood.
That is a beautiful plane. I hope that you enjoy using it.
Thanks for all the info! It does need a tote, which I had planned to make. It has a frog adjustment screw and a corrugated sole. I know next to nothing about hand planes, but am much more interested in making it useable than making it look brand new. I did not know the hardware would be difficult to source as that was the main thing I was thinking of replacing. I'll watch the Sellers video when I get a minute and keep cleaning it up. The blade and chip breaker cleaned up nicely with the coarse grit Sandflex. I need to get some of the rust on the frog and depth adjustment nut cleaned up. Never tried electrolysis, but we'll see.
on another note - I saw that @Mike Davis and Chris Black were having a conversation about PB Blaster for stuck screws. I agree that this is a GREAT product... it does take some patience, it needs time to work, but if you don't have a good way to put heat to a stuck screw this can be something of a secret weapon...
 www.acehardware.com
Blaster PB Spray Penetrating Catalyst 11 oz 1 pk - Ace Hardware
The #1-selling penetrant since 1957, PB B'laster quickly busts loose rusted or frozen parts caused by rust and corrosion. It also contains a non-evaporating lubricant that saves time and equipment and protects against further rust and corrosion.Find the CATALYST PENETRT PB 11OZ at Ace.
With the two I’m working on currently, I put the hardware bits in a bowl and squirted some Kroil penetrating oil on them. I took an old toothbrush to clean out threads and that was about it. They cleaned up nicely. You just have to get the caked on dust to loosen up.Most likely the hardware is fine. Use some WD-40 and let it soak if the threads are rusted on any of the screws. Use care and you should be able to remove these, clean 'em up, keep going.
Even on the body of the #6 that looked pretty rough, most of what I took to be rust was just grime. It’s looking so good I might actually take the time to paint it. but then all the others will look shabby by comparison and I’ll need to do the same with them
Nice repurpose! Very creative use.It then became a book rack.
Premier Sponsor
Our Sponsors
LATEST FOR SALE LISTINGS
-
-
Graco 395 FinishPro air assisted airless sprayer for sale
- Started by RobH
- Replies: 1
-

-
-