Mortise and tenon joints

Status
Not open for further replies.

ncreefer

New User
Kevin
I'm working on making a bed headboard for my wife. Its basically a frame with slats running vertically that will be painted in the end. I'm so new at this, I was thinking that I'm going to dowel slats in place and possibly countersink a screw for reinforcement. I was talking to my father in law and he suggested that I use a mortise and tenon joint for the frame, but I'm not sure how to do this with the tools I have a available. I have a circular, miter, and jig saw and a router (and table) with only a few straight bits. Can anyone give me a suggestion on how to do this?

Thanks.
 

timf67

New User
Tim
Not having a table saw will limit you somewhat, but it can be done. Heck some of the guys on here remember makeing M&T joints before power tools existed... :rolf:

The tenons can be cut either by hand or by using the your router and straight bits to shape the tenon. The mortises can be made by marking the tenon outline, drilling to depth multiple times with a round drill bit to rough out the opening and then you can clean it up with a hand chisel. Again, it isn't easy but it is doable. Your other option would be to use a floating tenon like the beadlock system.
 

Trent Mason

New User
Trent Mason
I'm not sure if I understand exactly what you're trying to do, but when I built our bed I used mortise and tenon joints to join the headboard to the posts (and the footboard). I think I made my tenons around an inch and found out later on from some folks on here (I think it was DavidF) that I probably should've gone longer on the tenons, like maybe 2 inches. But it has held up so far. :gar-Bi

bed_007.jpg


I made these tenons using a router and edge guide with a 1/4" straight bit (or it may have been 3/8") I cut the ends with a coping saw.


bed_014.jpg


I marked out the mortises, drew a straight line down the center of them and used the drill bit that corresponded with the width of the mortise. Then drilled a bunch of holes on the center line and cleaned it up with the router and edge guide. (Be sure to put a strip of tape on your bit so that you don't drill too deep)


bed_022.jpg


After a dry fit, I glued them up and used strap clamps to clamp it. I left it like this for about 24 hours.


tree_058.jpg


The finished product with matching nightstand.


I hope this has been helpful to you. There are a number of different ways to make mortises and tenons and I'm sure plenty of folks will chime in. I just wanted to share the way I did it because I was working with roughly the same tools. :icon_thum
 

ncreefer

New User
Kevin
The beadlock looks pretty interesting until I found it on amazon and saw that the router bit is at least $52 plus the jig or $30 for the kit plus the stock.
I'm sure the chisel would work, I didn't really think of that since I would be doing several of these joints. I guess I could always try it out on some scrap first to give it a try.

Nice work Trent, sounds like it wouldn't be to difficult to do it this way.
Strength wise how much of a difference would there be between dowels (reinforced with a screw) and a mortise and tenon? I thought I had it planned out, and already cut my stock for the headboard. I know I should have asked questions but I had a plan in my mind, and thought it would work.
 

Bas

Recovering tool addict
Bas
Corporate Member
You can do it with a router and loose tenons. Basically, make mortises in both pieces, then create a tenon out of some scrap stock and round over the edges. A circular saw w/ straightedge should do fine. You'd want to get a good router bit for creating your mortises, MLCS has some affordable spiral bits for this. You will also need a roundover bit, again not very expensive.

wb282-tenon02.jpg
 

fergy

New User
Fergy
Since you're painting in the end, you don't have to be worried about the appearance of grain.

So, you can tenon the vertical slats, or you can leave them full size if they are thinner than the other stock. Instead of cutting mortises, you can groove the entire piece that they are fitting into with the router table. Then use the router table to dado a series of cuts acrooss a filler piece that will fit into the groove you just cut. That filler piece will need to be the same thickness as the groove you cut, and both should match the thickness of your slats or the tenons on the end. Plane/snad flush, and you've got Instant mortises. Even easier if you've got a tablesaw.

Since you're painting, this will be easy to clean up and look seamless.
 

Mike Davis

Mike
Corporate Member
If you already cut your pieces to length then you can make the joints like Baz shows in his post. That will be the strongest joint.

But, you don't need to buy a router.

Layout the mortises, drill out the waste then clean up with a chisel.

Cut the loose tenons with your circular saw and sand or use a pocket knife to round the edges if you don't want to cut the mortises square at the ends. Either way will work.


I think some of the TV shows have put out the idea that fine furniture can be built in 30 minutes or less. Everybody keeps looking for the fastest way, sometimes the fast way takes longer or costs a lot more.

I'm a firm believer in finding ways to work with what you have or making the tools, jigs and designs to fit your needs, budget and abilities.

So, it's not the way they show on TV and doesn't use the most expensive tools. Who cares!

Just do the best you can with what you have, keep learning and doing.
 

ncreefer

New User
Kevin
I'm not necessarily looking for the fastest way to do this. I'm looking for the best way I can do it with my experience and my currently owned tools. I am probably being stubborn, but I'll probably go with my existing plan and mess around with some scraps to learn how to make the loose tenons. I do appreciate everyone's advice though and look forward to lots more of it. What is the standard size for making these joints? Say you were jointing 2 pieces of 2 x 4, what size would you make the mortise and tenon, is there a ratio you normally use?

I would like to buy more tools, but have limited myself to a new tool every couple of weeks. With a good set of pipe clamps being my purchase. I'm making my own as to cut cost and make them efficient for all size projects. This hobby is alot of like several others it will make you go broke if you're not careful.

Bas, can you make the mortise using a straight router bit?

Trent are the strap clamps nothing more then cam tie downs?
 

Mike Davis

Mike
Corporate Member
These are general rule of thumb for structural M&T.

Of course your thumb may very.


Tenon is usually 1/3 the thickness. Width of tenon is no more than 8 times thickness. Make multiple M&T for wide pieces.


Slats and panels are not considered structural so they can be full width tenon.
 

dkeller_nc

New User
David
I'm not necessarily looking for the fastest way to do this. I'm looking for the best way I can do it with my experience and my currently owned tools. I am probably being stubborn, but I'll probably go with my existing plan and mess around with some scraps to learn how to make the loose tenons.

NCReefer (it'd be good to update your profile with a first name, btw)-

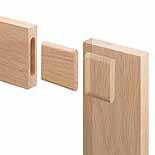
I'm going to suggest that you not go the loose tenon route in just this one particular instance. Because a headboard is subject to a lot of racking forces, you'll be depending solely on the glue in both mortises to hold everything tight, though it's possible you could pin both sides of the joint.

Instead, and with the tools you already have, I'm going to suggest that you make a traditional tenon on the ends of the rails, and a mortise in the legs. Your router and a couple of bits are all you need to do this, though you will either have to have a fence made for your router, or build a little auxillary base jig.

If you've a fence for your router, you can clamp both rails together on the bench, and set the fence so that you cut a clean shoulder on both sides of the rails - the outside material still left will allow your router something to ride on. Once that's done, you can clamp about a 4" wide board to the top surface of the two rails (the router base will ride on this), reset your fence and depth of cut, and use the router to remove the outer material on the rails (the router will ride on the clamped board, with the fence running on the rail side of the board). Presto - two tenons cut perfectly on your rails. You then just flip the rails and repeat the procedure. You will then have to decide whether you want an edge shoulder. If so, I would use the table saw and a miter gauge to do the Norm thing and make the shoulder cut, then "nibble away" the rest of the material.

For the mortise, you can use the router fence and a couple of stop blocks (just a couple of pieces of scrap clamped to the leg will do) to cut a mortise in a few passes. If you don't have a fence, you can make an auxillary base for your router out of 1/4" plywood in which you've mounted two downward-facing dowels on either side of the bit (as widely spaced as the auxillary router base will allow). One then simply seats these two dowels on opposite sides of the leg, and the router bit will automatically be centered on the stock.

I described this a bit backwards, by the way - it's usually best to cut your mortises first, and your tenons second (to fit the mortises).

By the way - on a bed, I always pin these joints by drilling through the back of the leg into and through the seated and glued tenon, then driving a dowel (with glue) into the joint. Then, even if the glue fails, the joint cannot come apart.
 

KC7CN

New User
Don
You can do it with a router and loose tenons. Basically, make mortises in both pieces, then create a tenon out of some scrap stock and round over the edges. A circular saw w/ straightedge should do fine. You'd want to get a good router bit for creating your mortises, MLCS has some affordable spiral bits for this. You will also need a roundover bit, again not very expensive.

wb282-tenon02.jpg

I recently used this technique for the first time! I used a 1/4'' upcut spiral bit with simple shop-made jig to cut the mortise. The tenons were from a small piece of Oak hardwood that I purchased from one of the BORG's several years ago. The fit was perfect! A roundover bit in the router table was used to round the edges of the tenons; you can make a lot of tenons in a short period of time!

The project I'm currently working on has several M&T joints, and this was my first experience for both traditional and loose joints. I like the loose tenon method! As was pointed out earlier, you can use a drill to make the mortises and round over the tenons with a rasp & sandpaper.

Another first for me on this project was using Gorilla Glue; I have been avoiding it for a long time because it is expensive compared to standard yellow glues, and has a rather short shelf life. What I like about it, is the longer open time and gap filling properties. I'm certainly no glue expert, but you might want to consider it for your project. Besure to buy the right Gorilla glue - the expands to fill gaps, and read the directions on how to use it.

-Don
 

James Davis

New User
James Davis
While I agree with David, in this instance with you already having the pieces cut and not wanting to go out and buy more stock, pinning the joint on both the rail and the leg side of both joints should suffice. The technique of drilling the mortises first and then cleaning out with a chisel makes a lot of sense. The mortises for the slats can be as simple as cutting a groove the entire length of the rail as someone suggested and then cutting a filler strip and cutting pieces to fit between the slats. You could cut the filler to be flush with the top of the rail or you could make it stand proud a little depending on YOUR preference.

James
 

Joe Scharle

New User
Joe
This one's made with sandwich construction. 2 outside pieces, with a filler in-between to create 'mortises'. Filler blocks between the slats. Poplar. If you cant cut curves, you could make it square.

Headboard1.jpg
 

ncreefer

New User
Kevin
Joe, looks good.

I was thinking of posting my headboard when it was finished, but I think I may be embarrassed. I definately need to work on my skills.
 

DavidF

New User
David
For painted work like yours the long groove in the top and bottom rails and then stub tenons or loose tenons as your stock is already cut, on the slats, with filler pieces looks like a nice solution. For non painted versions perhaps the filler strips could be in contrasting wood?
 

merrill77

Master Scrap Maker
Chris
Maybe I'm the only one who didn't get it from your post - but are you talking about M&T for the vertical slats into the horizontal rails, or the horizontal rails into the corner posts?

For the rail-to-post joinery, I'll throw out a suggestion that I haven't heard yet. I'm assuming the horizontal rails of the frame (from post to post) will be 3/4 stock. If you were to glue up your end posts from 3 pieces of 3/4 stock (resulting in a 2.25" square post), you could simply leave a void in your glued-up post that would be the mortise. Your rail would then slip right in! I'm not sure if my description is clear enough...I could try a sketch, I suppose. Oooh...just remembered - it's kinda like this first picture of how I built my carving mallet. Rather than cutting out a mortise, the post would be built around the mortise...so nothing to cut out.
 

Mike Davis

Mike
Corporate Member
Just to help clarify.

He is talking about joining the frame of the headboard and foot board.

The pieces are already cut.

He had planned on making dowel joints.

There is no length available for cutting a tenon on the horizontal parts.

HTH
 

merrill77

Master Scrap Maker
Chris
Ahh...with that additional information, I'd recommend either (a) go with the mortise and loose tenon suggestion, cutting the mortises with your router, or (b) borrow a biscuit joiner.
 

ncreefer

New User
Kevin
I think I'm going to give the loose mortise and tenon a shot. I just need to get myself a chisel and a bigger drill bit (and wait for my garage shop to cool down a little).

Thanks everyone.
 
Status
Not open for further replies.

Premier Sponsor

Our Sponsors

LATEST FOR SALE LISTINGS

Top