
Hey all! Been awhile since Ive posted, but here goes. This post will be continously updated till project is complete.
This is my first major project in a looooong time, and Im very exctited bout it.
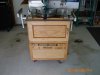
First, the old: See pics below (hint: Think Black and Decker, LOL)
This miter saw stand was one of my earliest projects and its painfully obvious. I used alot of scraps, pine and ply as well as mdf. Functional but not aesthetically pleasing.
I recently snagged some nice mdf (see found hot deals) and some angle iron, and decided to build something nicer.
There are basically 3 major sections : Frame, Top and Sides.
First the Frame: I used 3/4 in angle iron. Dimensions are 18in X18inX29 3/4 in. Since this is basically a woodworking stand, Im not going to detail its construction, except to say its welded.


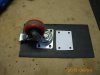
 I also used 17 ga steel for the base feet (to support 4in double locking casters.
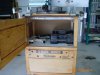
After welding, priming and painting (black) I next started on the Top.
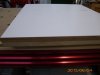
The dimensions used were similiar to the old top. 20in X 26in X 1 1/4 in thick with white laminate and black edgebanding.


 After double laminating the two pieces of mdf, I next applied contact cement to the laminate bottom and mdf top (make sure to leave approx 1/16 or so overage on all sides). After glue dried, I then used laminate router to clean up the edges. As a side note, these were laminate pieces, so consequently, I did not have a full sheet, so as you can see in pic there is a seam. This seam was strategically placed where it will line up along the table and wont be to obvious.
Next, I then set up the table saw to cut a kerf in the center of the top ( 1/4 in deep , 1/8th in wide, blade width).
After that, insert edgebanding into kerf and tap with a hammer. If done correctly, usually no glue needed.
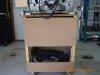
So far, Ive got about 9 hrs into this. I now need to complete the sides.
For the sides, I plan to use a mdf panel with white peg board on 3 sides. There may be a drawer and open bottom section for storage.
See you with next and completed sides.
Thanks for looking
Splint

This is my first major project in a looooong time, and Im very exctited bout it.
First, the old: See pics below (hint: Think Black and Decker, LOL)
This miter saw stand was one of my earliest projects and its painfully obvious. I used alot of scraps, pine and ply as well as mdf. Functional but not aesthetically pleasing.
I recently snagged some nice mdf (see found hot deals) and some angle iron, and decided to build something nicer.
There are basically 3 major sections : Frame, Top and Sides.
First the Frame: I used 3/4 in angle iron. Dimensions are 18in X18inX29 3/4 in. Since this is basically a woodworking stand, Im not going to detail its construction, except to say its welded.
I also used 17 ga steel for the base feet (to support 4in double locking casters.After welding, priming and painting (black) I next started on the Top.
The dimensions used were similiar to the old top. 20in X 26in X 1 1/4 in thick with white laminate and black edgebanding.
After double laminating the two pieces of mdf, I next applied contact cement to the laminate bottom and mdf top (make sure to leave approx 1/16 or so overage on all sides). After glue dried, I then used laminate router to clean up the edges. As a side note, these were laminate pieces, so consequently, I did not have a full sheet, so as you can see in pic there is a seam. This seam was strategically placed where it will line up along the table and wont be to obvious.Next, I then set up the table saw to cut a kerf in the center of the top ( 1/4 in deep , 1/8th in wide, blade width).
After that, insert edgebanding into kerf and tap with a hammer. If done correctly, usually no glue needed.
So far, Ive got about 9 hrs into this. I now need to complete the sides.
For the sides, I plan to use a mdf panel with white peg board on 3 sides. There may be a drawer and open bottom section for storage.
See you with next and completed sides.
Thanks for looking
Splint
Attachments


Last edited:


