Japanese toolchest - Shou Sugi Ban Finish - From Tool tote Workshop

Status
Not open for further replies.

Mark Gottesman

New User
Mark
Last December Mike Davis and Bill Clemmons put together a Tool Tote Workshop at Bill's shop in Liberty. I decided to use the workshop to make a Japanese style closed chest rather than the open tote with Dovetail corners. Just worked better for my needs.

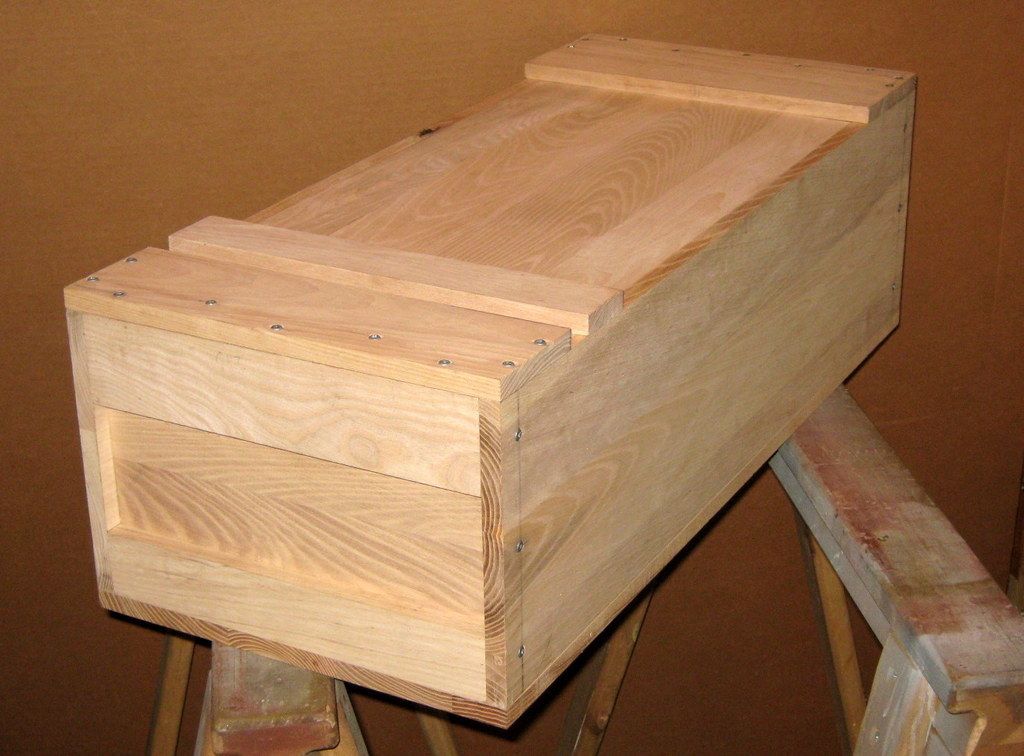
Anyway, This was the end product in the white:


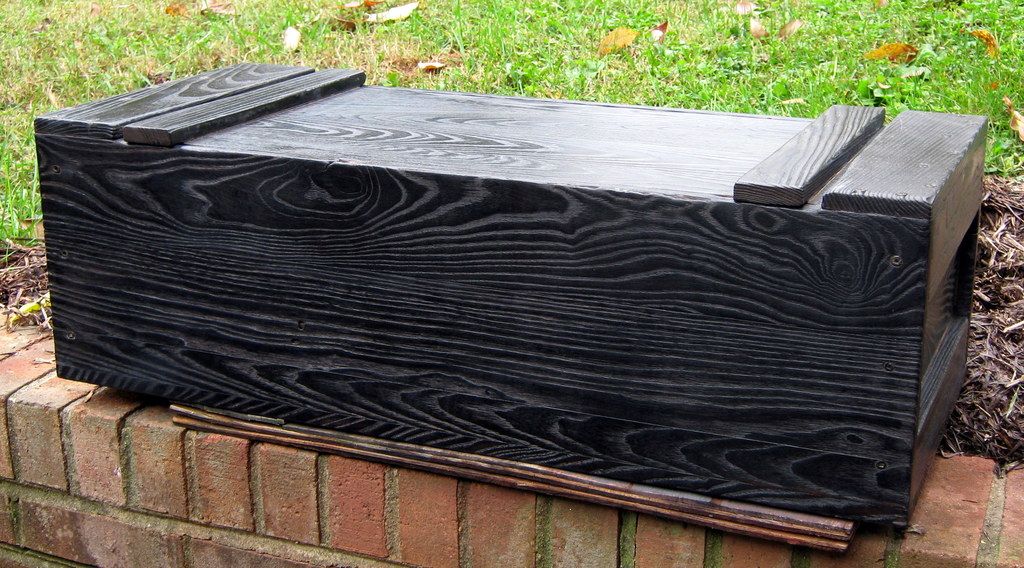
I was casting around for a finish and, since I like fire, ended up giving a burned finish to the box and topped that off with a homemade wax finish applied with a shopmade Pollisoir. Internal trays were added to see if they work for me. Real simple construction of nails and butt joints. I had thought of fingerjointing them but ran out of steam.


Here is the finished box. I really like how it looks. The finish has a lot of depth and subtle color variations plus the wax gives a smooth yet grippy feel.


For more and larger images


http://s164.photobucket.com/user/gyozu/library/Woodworking Projects/Japanese Tool box MDG 2014
 

Hmerkle

Board of Directors, Development Director
Hank
Staff member
Corporate Member
That is REALLY nice Mark.

I LOVE the finish.

What is the wood?


You mentioned a "shop made Pollisor"
Can you share a little more?
 

nn4jw

New User
Jim
Great looking chest, Mark. Good selection of pictures in photobucket, too.

Just for my own education, what does the polissoir do for you that other methods for applying and buffing the wax don't? I've not tried one myself.
 

Mark Gottesman

New User
Mark
The wood is ash flooring. I found a bundle at ReStore for short money. It was flat saw for the most part and that helps with the striking pattern. I think it will hold up well as a transport/storage chest. These chests were traditionally made from pine so this chest is heavier. The joinery ranges all over the place. From simple nails to fancy through mortices. I went simple.

Pollisoir. first off, I spelled it wrong. it is

Polissoir

Here is a link to a Schwarz blog entry that got me started and will explain why it works in this application. It applies wax, forcing it into the pores and burnishes the surface. Found it while researching wax finishes.
http://www.popularwoodworking.com/t...oduction-to-the-polissoir-roubos-wax-polisher

and here is the link to the fabrication info I used:
http://hillbillydaiku.com/2014/04/17/finishing-with-the-polissoir/

As you can see in the album, mine is the ghetto version, but it works as advertised.

Glad to answer any other questions.
 

kooshball

David
Corporate Member
Bad a*s! I have always been a fan of Shou Sugi Ban for siding but this brings many new ideas to mind.

thanks for sharing and well done!
 

Mark Gottesman

New User
Mark
Very nice! Did you just use a propane torch for burning?


I did the majority of the burning with a Harbor Freight weedburner. I used a small bernzomatic to do some fill-in/touch-up after the main colouring. Further searching of the web after I finished this turned up a video where the craftsman was using heated metal blocks with a handle to do the burning. My opinion is that this would be a more controllable method than a weedburner for smaller projects.
 

SubGuy

Administrator
Zach
I plan on fabbing one of these up. I have noticed similar Japanese craftsman doing the same. I did some reading and it helps the hard rings stand out more as well as controlling even burn. I just need to find a big hunk of metal to put a long handle on. It's that time to run the wood stove in the shop anyway. Thanks for sharing.
I did the majority of the burning with a Harbor Freight weedburner. I used a small bernzomatic to do some fill-in/touch-up after the main colouring. Further searching of the web after I finished this turned up a video where the craftsman was using heated metal blocks with a handle to do the burning. My opinion is that this would be a more controllable method than a weedburner for smaller projects.
 

Jeff

New User
Jeff
Good stuff. I've been reading about it and following the postings here since you and SubGuy posted the technique awhile ago.

I tried it on a piece of pine using a Bernz-O-Matic torch and it sure made the flat sawn grain pattern stand out.

Did you wire brush the char before applying the wax finish?
 

Mark Gottesman

New User
Mark
Yes, I started using a steel wire brush but that was leaving a visible scratch pattern in the charred wood so i changed over to a fine bristle brass brush like they use to brush suede shoes. The scratch pattern was more to my liking. Then waxing it using the polissoir both filled and burnished the surface to futher reduce the scratches. At least, to my eye.

I would thing that certain nylon or tampico brushes would also work. You just want to knock off the loose char and I used the wax to help seal it.
 
Status
Not open for further replies.

Premier Sponsor

Our Sponsors

Top