Inlaying Metal into Wood

China Woody

New User
John
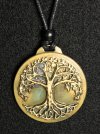
I have been making small brass medallions for a while now, on the CNC machine, for use as pendants (see attached photo.) I have never tried inlay of any kind (probably be more sensible to try wood on wood first, but, well, sometimes compulsive behavior gets in the way of common sense.) Anyway, I was thinking about making a jewel box or something with walnut or paduk, with inlays of brass medallions - like the necklace medallion, but without the cord.

Anybody had any experience, good or bad, inlaying metal into wood? Anything special to watch out for?
Thanks.
 

Attachments

  • Tree of Life.JPG
    Tree of Life.JPG
    2.1 MB · Views: 103

creasman

Jim
Staff member
Corporate Member
I recall @danmart77 inlays silver wire into some of rifle stocks. This is a bit different than you are doing. For some of the tools I've made I used a 2-part epoxy to glue brass plates to the areas that receive wear. That has worked well for me.
 

China Woody

New User
John
After I posted the question about inlaying metal into wood, it occurred to me that if the metal object was round, I could just get the forstner bit out and drill a shallow hole for the medallion to sit in. But then -- what if the edges were irregular? Seems like a different question as to how to inlay it.
 

Attachments

  • Norse Warrior.JPG
    Norse Warrior.JPG
    2.7 MB · Views: 99

cyclopentadiene

Update your profile with your name
User
Can you not use the CNC machine and drawing for the medallion to cut the irregular shape. I would think a few hundredths of an inch larger cut in the wood should work
 

China Woody

New User
John
Can you just use the inlay option in your CNC design software?
Yes, Dan, I think I will try that. I was concerned about finishing, wondering about sanding two different types of materials. I think I'll just have to polish the brass, then make sure that the finish fit is close enough that the box doesn't require much sanding.
 

Linc H

Linc
Corporate Member
China, I have inlayed 2 challenge coins into this Cigar ashtray. Not sure this is how you were considering embedding your medallions. I finished the woodworking and then applied the coins into a 1 3/4 " routed hole. I have created a method for removing the coins so the client can change them out as needed. Anyway thought I would share to see if it is helpful. Your medallions are beautiful!!
 

Attachments

  • Cherry Cigar Ashtray LH.jpg
    Cherry Cigar Ashtray LH.jpg
    1.9 MB · Views: 99

tri4sale

Daniel
Corporate Member
Yes, Dan, I think I will try that. I was concerned about finishing, wondering about sanding two different types of materials. I think I'll just have to polish the brass, then make sure that the finish fit is close enough that the box doesn't require much sanding.

I would do all the sanding and finishing to wood prior to gluing the inlay in. Maybe use some painters tape in the inlay area while finishing wood so that it limits the effect the finish has on inlay hole.
 

cyclopentadiene

Update your profile with your name
User
I would finish the box first with covering the bottom if the cutout. The brass can be inlaid after finish and the epoxy squeeze out is easily cleaned with alcohol. The accuracy of a CNC, it should be easy to fit perfectly
 

JNCarr

Joe
Corporate Member
I have done metal (and wood and plastic) inlays several time with no problems. Use the outline cut path of the medallion as your pocket outline and increase the size by about .005-008 for a tight fit. Remember that you will get different sized pockets for a conventional cut vs a climb cut - test your specific CNC to see what that difference is. That will also impact the above numbers. I'd run a test (remember to drill a poke hole in through the test piece to poke the medallion out from the backside). As others have pointed out, finish the box first. I use a down bit for at least the perimeter to minimize chipout, then change to an up bit to clear the waste.
 

JNCarr

Joe
Corporate Member
Oh... I found that PU adhesive (gorilla glue) works just fine and is easier than mixing epoxy. Just roughen the glue surface as you would epoxy.
While not as much as the old brown gorilla glue, the new version expands a little also, so clamp or weigh down the medallion during the cure.
 

China Woody

New User
John
China, I have inlayed 2 challenge coins into this Cigar ashtray. Not sure this is how you were considering embedding your medallions. I finished the woodworking and then applied the coins into a 1 3/4 " routed hole. I have created a method for removing the coins so the client can change them out as needed. Anyway thought I would share to see if it is helpful. Your medallions are beautiful!!
Linc, that is very useful, thanks. Is the coin secured by the fit, or some other way? What is the scheme you use to be able to change the coin?
 

KenOfCary

Ken
Staff member
Corporate Member
Yes, I would check Dan's gallery and seek his advice if needed. He inlays brass into some of his gun stocks often and probably has some tips to help out.
 

Linc H

Linc
Corporate Member
Linc, that is very useful, thanks. Is the coin secured by the fit, or some other way? What is the scheme you use to be able to change the coin?
It is just by fit and I routed out the hole at 2 different levels so when you push down on one side of the coin it pivots up and you can grab the edge to remove. In order to get this to pivot you only need to have half the hole about the thickness of the coin deeper so it can clear the top when you push down. hope this helps
 

China Woody

New User
John
I would finish the box first with covering the bottom if the cutout. The brass can be inlaid after finish and the epoxy squeeze out is easily cleaned with alcohol. The accuracy of a CNC, it should be easy to fit perfectly
Cyclo -- Thanks for that advice. Most of my metal work has been free-standing in the past, and it is good to see how you would do the inlay and finish. Very helpful.
 

China Woody

New User
John
I have done metal (and wood and plastic) inlays several time with no problems. Use the outline cut path of the medallion as your pocket outline and increase the size by about .005-008 for a tight fit. Remember that you will get different sized pockets for a conventional cut vs a climb cut - test your specific CNC to see what that difference is. That will also impact the above numbers. I'd run a test (remember to drill a poke hole in through the test piece to poke the medallion out from the backside). As others have pointed out, finish the box first. I use a down bit for at least the perimeter to minimize chipout, then change to an up bit to clear the waste.
Joe, thanks very much for the tips. You are giving me good specifics to work with. Trial and error is a good teacher, but with the added complexity, time and cost of the metal cutting, it is good to have some specific recommendations, and not have to do so much guessing. That was a good reminder about conventional vs climb cut effecting the pocket size. Also about the Gorilla glue. Appreciate your help.
 

China Woody

New User
John
It is just by fit and I routed out the hole at 2 different levels so when you push down on one side of the coin it pivots up and you can grab the edge to remove. In order to get this to pivot you only need to have half the hole about the thickness of the coin deeper so it can clear the top when you push down. hope this helps
Linc, interesting solution -- I'll remember that. Thanks.
 

Premier Sponsor

Our Sponsors

LATEST FOR SALE LISTINGS

Top