Grooving plane for shoulder boxed planes

Scott H

Scott
User
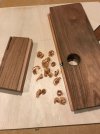
I'm still tooling up to make real moulding planes, but after seeing @creasman post his completed snipe's bills the other day, I was motivated to just make something. I ended up making a strange specialty plane that I am not sure I have seen anywhere before.

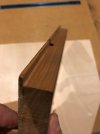
The plane cuts an 1/8" wide groove approximately 1/4" deep, but the unique thing is that the groove's side is flush with the reference surface the plane rides on. I am going to use this with a sort of tilted platform to cut the recess for boxing in wooden planes. Since it cuts a groove flush with the reference surface, you can run a rabbet plane on the tilted platform first to create a shoulder on the plane billet, and then use this plane to create the deeper recess needed for shoulder boxing, like you can see in Caleb James' rabbet plane plans or Matt Bickford's rabbet planes.

You could accomplish that with a router table or a table saw, or even just a rabbet plane and a plow if you can really hold the plow at a consistent tilt to the workpiece, but this was a fun project and is very quick and quiet to use. There is very limited setup required, too. Most of the setup will be in making a platform for it to ride on that matches the desired angle and placement of the boxing for a given billet thickness.

Some random details about the plane:
  • I just made it out of a random piece of cherry, it is not quartersawn or anything. I just wanted to make something quick and dirty, not perfect.
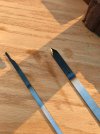
  • The blade is 1/8"x1/4"x8" O1 tool steel that necks down to 1/8"x1/8" on the business end, tapered on a 1x30 belt sander and hardened with just a propane torch, then tempered at 400 F for 2 hrs in a toaster oven. I thought I screwed up the hardening because I wasn't getting conclusive file skating after quenching, but once I tempered and sharpened it it seems perfectly fine. I was able to cut two 8" long full depth grooves in SYP and still shave arm hair with it, so whatever happened the steel sure isn't dead soft. I don't get huge burrs or wire edges when sharpening it like I would expect with soft steel.
  • The blade projects about 0.010" from the side of the plane, and also from the other side of the skate.
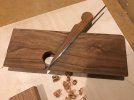
  • The design is sort of a hybrid between a Roubo moulding plane and a plow plane. I learned a lot about why plow planes are designed the way they are.
  • The wedge has a compound angle on the breast like a Roubo moulding plane, so there's no tendency for it to pop out sideways.
  • Cherry does not make a very durable skate, but it should be OK for what I need to make it do, since it doesn't have to take fine shavings. The final depth is set by the depth stop, not the skate, anyway. If I was to make another I would probably use a much harder wood for the skate, or maybe even metal. Mostly the problem is the cherry compresses easily when you only have a ~1/10th wide strip of it pressing against the work, and the edges of the skate splinter easily. It doesn't seem to be in danger of bending or snapping off, though.
  • I get a little chatter taking thicker shavings -- there's probably not really enough support near the cutting edge -- but that is fine for what this needs to do. Usually the last pass cleans it up as it hits the depth stop.
  • I don't know why I did this but the bed angle is 55 degrees. I don't think I would do that if I had to make it again, I would probably just do 45 for ease of cutting. Tear out at the bottom of the groove is irrelevant.
This is my first plane where I have made both the body and the iron myself. I am pretty happy with it all things considered.
 

Attachments

  • IMG_1065.jpeg
    IMG_1065.jpeg
    1.8 MB · Views: 124
  • IMG_1066.jpeg
    IMG_1066.jpeg
    1.8 MB · Views: 127
  • IMG_1067.jpeg
    IMG_1067.jpeg
    1.2 MB · Views: 116
  • IMG_1054.jpeg
    IMG_1054.jpeg
    1.8 MB · Views: 129
Last edited:

Scott H

Scott
User
At least twice now I've gone to disassemble this plane in the morning, and overnight it's gotten a death grip on the iron, despite the taper. Today I had to tap the blade out sideways using a pin punch after all the usual options didn't work. The unhardened tang also likes to deflect rather than transmit all the hammer force to movement.

I am going to write it up to probably wood movement? The wood was kiln dried and had been inside the same room as the plane now is for at least 1.5-2 years, room is indoors + climate controlled, but maybe stresses from cutting are still working their way out, or the wood is catching up to ambient humidity faster now that it's in a smaller chunk? I didn't pick this design or the wood for stability, I guess...

I have heard of this sort of thing happening with really old moulding planes but not a brand new one.

For now I guess I will store it with the wedge almost loose. I am a little worried if I have this happen with a side escapement or rabbet plane I am not going to have the same solution available to me.
 

creasman

Jim
Staff member
Corporate Member
Thanks or posting this information. Very helpful. You're definitely on the right track with making a speciality plane to cut the boxing groove. I used the table saw for this groove in the snipe bill planes, not giving much thought to other ways of doing this task. When I took Stephen's class a few weeks ago I asked him how he cut the grooves for boxing. He cuts these with a plane as you describe, with a couple of extra twists:
  • He has a board for holding the plane billet while he cuts the groove. This works (and looks) much like a shooting board. The billet is held in place and the grooving plane slides along the board. He can raise, lower or tilt the slide to adjust how the groove is cut.
  • For his grooving plane has added a tote and handle, just like you find on a bench plane. This allows easy control over the plane when in use.
He has a couple of varieties of these planes -- one for cutting a single boxing groove, and another that cuts two parallel grooves. The latter is used when making a bead-n-follow plane.

Regarding the tight wedge it may be an issue with the wood "settling in" to its new form. Another reason is the open wedge. Since the wedge is not inside a mortise the body can bow ever so slightly as the wedge is tightened. You probably don't notice this. The effect, however, is to add another source of tension on the iron -- that of the body resisting the flex created by tightening the wedge. If you make another one of these planes I'd suggest moving the wedge to the other side of the iron so you can still keep it inside a mortise.

Nice work!
 

Scott H

Scott
User
Well I guess that is a good sign that I'm not the only person to try this!

I thought about putting a knob and tote on the plane. I didn't end up doing it yet but since it is used on its side it would make it a lot more comfortable to use. It is not too terrible as-is but if I was going to use it day in and day out I would definitely do that.

Are you suggesting basically reversing where the wedge and iron are? So the iron is against the breast surface of the mortise and the wedge is against the bed?
 

creasman

Jim
Staff member
Corporate Member
Are you suggesting basically reversing where the wedge and iron are? So the iron is against the breast surface of the mortise and the wedge is against the bed?
I was thinking of leaving the iron as is, but moving the wedge so that it lines up with the other side of the iron (the side that doesn't do any cutting). The wedge would be about 1/8" thick in this case. Or, you could increase the width of the iron to 5/16" and use a 3/16" wedge.

You could also try the same body style, but using a quarter-sawn billet to see if that improves the tightness.

These are just my thoughts. I'm out of my depth here ;-).
 

Scott H

Scott
User
Hmmm, I will have to think about how that affects things. It does make me appreciate the benefits of the mortise instead of the Roubo style open wedge pocket. I originally went with this style because my floats aren't finished yet and it's "easier."

At this point I am probably going to only make another of these if this one completely breaks on me (not impossible), or I need a different geometry, but I'm saving all this for later.

I am still dialing in my O1 heat treating process. I'm struggling to get stuff to skate a file right out of the quench, mostly trying small stock (1/8x1/4.) I only have a torch, no forge yet. Tried using a larger oil container and preheating it to 150 F today, but then I learned how hard it is to see "red hot" or even the torch flame in sunlight so I only had the magnet to go on. Today, one piece out of three skated a file on one face. Not a great success rate.

At this point I'm pretty sure it's related to the metal not being hot enough before it goes into the quench. I think the next step is to build a forge and see if that improves things.
 

creasman

Jim
Staff member
Corporate Member
I'm not sure how important the file test is. The main thing is to get it heated evenly (through) to the point where it's no longer magnetic. That occurs at around 1800 degrees. If you see it start to blister that means it's getting too hot and the carbon is leaving the steel. I agree it's hard to gauge by the color, especially while looking inside a furnace.

I preheat the irons for a minute or two, then move them to where the flame is focused just at the base of the flag. I rotate the iron once or twice and begin moving it back so the heat moves toward the end of the iron. Once I think the edge has reached the desired temperature I give it the magnet test. If it's good, then quench.
 

Scott H

Scott
User
To make a long story short regarding file testing, the marking knife I made at the same time as this iron came out way too soft, the edge rolls very easily, and I'm systematically working back through all the things I can think of that could cause this. I am pretty sure it is the heating to critical/quenching process. I've been turning it over and over in my head for a few days trying to figure out what I screwed up but I have pretty much ruled out steel chemistry, decarb/overheated edge and the tempering process at this point. I don't know of a better garage test for a successful quench than file testing at this point.

I am not 100% sure the iron turned out the hardness I wanted either but I am not going to destructively test it since it functions for what it needs to do (plow at least 1 groove between sharpening)

The first O1 sample I actually got to skate a file (right out of quench) has the edge characteristics I expected.

Ultimately though you're right, I don't directly care about the fileability or hardness I just want it to be able to get steel that will predictably get sharp and stay sharp within reason.

I order a set of those Japanese rockwell testing files, those are coming in tomorrow, maybe I can quantify things better afterward.
 
Last edited:

Scott H

Scott
User
Also, not trying to be picky here or anything, but are you sure it is 1800 F? I am reading it is probably going to be more like 1400-1420 F that it stops being nonmagnetic. Most sources I am seeing recommend getting to 1475-1500 before quench.
 

creasman

Jim
Staff member
Corporate Member
Yes, you're right. It should be around 1500 degrees. I should have checked my facts before replying earlier. You can look for a color match, but I find the magnet test much easier. Also, I trust the magnet over my eyes to get it right.

Looking forward to how testing with the special files goes.
 

Scott H

Scott
User
So I'm still getting the feel of these files. Comparing to card scraper that is supposed to be 50 HRC. There is some distance between "can't feel the file bite" vs "doesn't leave any visible mark at all." I am working based off the idea that if the file slides it is not truly cutting.

Best guess currently is,

First batch (when I could see colors):
Grooving plane blade is between 45-50 HRC
Marking knife is between 45-50 HRC

Second batch (couldn't see colors):
"Successful" test piece from the other day (hardest filing so far after quench) is 55-60 HRC (55 barely barely cuts)
Other test pieces from other day did not reach 40 HRC
 

Premier Sponsor

Our Sponsors

LATEST FOR SALE LISTINGS

Top