Floating Shelves

JimD

Jim
Senior User
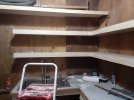
I wanted some shelves above a sink I recently added to a storage room off my garage and a 8 foot+ wall at right angles (roughly) to this wall. One side cannot go to the wall because that is where the breaker box is. So when I saw Willemjm (Willem) post about his floating shelves including some dimensions, I decided to give them a try.

I used scrap 3/4 plywood and about half of a new sheet plus a sheet of 5mm underlayment plywood and a sheet of 3mm plywood. I was just trying to be cheap with the 3mm, I used it for the bottoms. They are not stressed but it is more than a little floppy. It would be better to just use at least 5mm for the bottom too (Willem recommended 1/4). But the shelves work great! One question I had was with the relatively thin plywood top but I think it works fine.

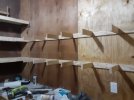
I will include a picture of a little strength test I did for the first shelf. I put two full gallons of paint on one corner. Gallons of paint are about the heaviest thing I can think I would put on these shelves. Mostly I will put paint brushes, rollers, etc.. I am convinced they are plenty strong enough for my purposes. I used pocket screws and titebond 2 to attach the short pieces that project from the wall to the strip screwed into the studs. I decided there was not enough room to use pocket screws to attach the front strip and it is less stressed so it got 2 inch 18 gauge brads top and bottom and a 1 5/8 through screw in the center. It got glue too. The top and bottom are rabbeted to the front and attached with glue, brads, and staples for the bottom. That is another way the thin bottom did not work so great. Brads would not hold it. So I used staples. Clamping the plywood in place while the glue dried would look better but I was not too concerned about appearance for this application. It would also take a lot of clamps. But with 5mm or thicker plywood, brads would work, they did on the tops.

I rolled a couple coats of water borne poly on them just to help with cleanup today.

Thanks to Willem, his design is great, doesn't use much materials, and is quick and pretty easy to put together.
 

Attachments

  • finished floating shelves.jpg
    finished floating shelves.jpg
    522.3 KB · Views: 163
  • first stage floating shelves on wall.jpg
    first stage floating shelves on wall.jpg
    476.9 KB · Views: 164
  • strength test, floating shelves.jpg
    strength test, floating shelves.jpg
    589.8 KB · Views: 160

Henry W

Henry
Corporate Member
Thanks for the review of sorts Jim.
Most people doing these are concerned about aesthetics because these are in 'show' areas of the home. However they also have a place as utility shelves.
 

CrealBilly

New User
Jeff
The boss has been wanting a 10" wide shelf so she can put her coffee cup collection and dust gathering stuff on. It needs to be 10"wide and about 12' long. I've been waiting for the right board to come along. But... This just might do the trick. Mind if I use this?
 

JimD

Jim
Senior User
It's Willem's design. I think he posted it figuring others would try the design. He said he uses 2.5 inch height for shelves 10 inches deep. I made the structure about 5/8 thinner than the cover (I actually reduced this a little due to the thin bottom). So for 2.5 inches tall I would make the inner structure 1 7/8 tall. That gives you 1/8 clearance with 1/4 top and bottom pieces.

In addition to the "strength test" I posted a picture of I pulled on it pretty good. It flexs a little but didn't seem close to failure. I also think Willem is right about the high stress areas. The top pocket screw of the inner structure takes most of the weight and the inner structure also tries to rotate into the wall due to the load. But a test beats a calculation and Willem said he tested it with 200 lbs successfully. Using hardwood would also increase the strength due to greater withdrawl strength of the pocket screws.
 

Roy G

Roy
Senior User
Back in the black and white FWW days, Ian Kirby had an article on torsion boxes. He made a shelf like you did and demonstrated how strong it was by sitting on it. Nice construction technique.

Roy G
 

CrealBilly

New User
Jeff
It's Willem's design. I think he posted it figuring others would try the design. He said he uses 2.5 inch height for shelves 10 inches deep. I made the structure about 5/8 thinner than the cover (I actually reduced this a little due to the thin bottom). So for 2.5 inches tall I would make the inner structure 1 7/8 tall. That gives you 1/8 clearance with 1/4 top and bottom pieces.

In addition to the "strength test" I posted a picture of I pulled on it pretty good. It flexs a little but didn't seem close to failure. I also think Willem is right about the high stress areas. The top pocket screw of the inner structure takes most of the weight and the inner structure also tries to rotate into the wall due to the load. But a test beats a calculation and Willem said he tested it with 200 lbs successfully. Using hardwood would also increase the strength due to greater withdrawl strength of the pocket screws.
Can you point me to the original thread - please? So is frame all butt joints or M&T or ???
 

Henry W

Henry
Corporate Member
.... . I used pocket screws and titebond 2 to attach the short pieces that project from the wall to the strip screwed into the studs. I decided there was not enough room to use pocket screws to attach the front strip and it is less stressed so it got 2 inch 18 gauge brads top and bottom and a 1 5/8 through screw in the center. It got glue too. The top and bottom are rabbeted to the front and attached with glue, brads, and staples for the bottom. That is another way the thin bottom did not work so great. Brads would not hold it. So I used staples. Clamping the plywood in place while the glue dried would look better but I was not too concerned about appearance for this application. It would also take a lot of clamps. But with 5mm or thicker plywood, brads would work, they did on the tops.
....
So you built these in place, with screws into the wall - Correct? Or to put this another way, the skins or outer layers were installed in place, rather than as a separate sleeve?
When whoever wants or needs to remove these, it has to be done by de-constructing the shelf? Just wondering.
I don't have a problem with that, but just want clarification. Thanks
 
Last edited:

JimD

Jim
Senior User
I glued and rpocket screwed the pieces that come out away from the wall to the piece that screws into the wall in the shop first. I drilled holes for the screws into the studs first, you need to avoid putting one of the pieces that come out away from the wall where a stud is, you need to hit as many studs as possible. I then fastened the back part of the inner structure with the short pieces that come out from it to the wall with two 2 1/2 inch screws into each stud. Then I put the front piece on the inner structure with a couple 2 inch 18 gauge brads and glue then a 1 5/8 screw in the center. Then the top and bottom pieces of thin plywood were glued and bradded to the front and the one end I had (the front was mitered to the end and both were rabbeted for the top and bottom skins). Then the top + bottom + front + end piece was slid over the supports. At that point the shelf works but I put a few brads in so it doesn't slide back off.

If I wanted to remove it, I would have to pry the top/bottom skin off the supports overcoming the brads. Then the inner structure could be unscrewed from the studs. It would be easier, I think, than most shelf removal. But only if you think to pry the skin out as the first step. Once it's off, an impact driver could remove the long studs into the studs quickly and easily.
 

Premier Sponsor

Our Sponsors

LATEST FOR SALE LISTINGS

Top