While you don't need them and they add little strength biscuits can be handy with glued/screwed joints because they help align the parts. They are especially helpful with pocket screw joints because those screws tend to shift the pieces around and the biscuits help resist that.
You are using an out of date browser. It may not display this or other websites correctly.
You should upgrade or use an alternative browser.
You should upgrade or use an alternative browser.
Cover for Drain Pipe
- Thread starter ralitaco
- Start date
I can vouch for thatThey are especially helpful with pocket screw joints because those screws tend to shift the pieces around and the biscuits help resist that.
So I jumped in the deep end and tried my hand at building the shelf. I used pocket holes and glue for the sides, pre-drilled holes for the shelves and used some deck screws to secure them. I cut the top cover and need to decide what I am going to cover it with. Also need to install the dowels in the top to secure it to the shelf and then pre-drill some holes through the cabinet into the shelf to secure it.
After that, I will hand it over to my wife to paint.
Thanks to everyone for the insight and suggestions so far.
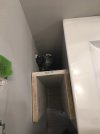
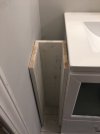
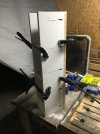
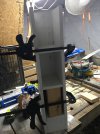
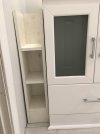
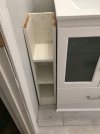
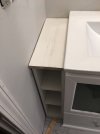
I like ceramic tile for kitchen and bath counters (but I like granite and marble more  ). You might even find a long narrow tile that didn't need to be cut. Or you might get lucky and be able to get a small scrap of granite or marble countertop cut to fit by a place doing counter tops.
I have been mostly successful using a cheap angle grinder with an abrasive blade sold to cut brick to cut ceramic tile. The last bathroom I did (where that vanity is) I had to rent a wet saw at home depot. Their smallest model works fine. I also use a wet saw on granite tile.
I have been mostly successful using a cheap angle grinder with an abrasive blade sold to cut brick to cut ceramic tile. The last bathroom I did (where that vanity is) I had to rent a wet saw at home depot. Their smallest model works fine. I also use a wet saw on granite tile.
"It's more trouble than it's worth" / I have never built anything like this. \ If I mess it up, I can just close it up.
I think the 'more trouble' comment was meant to be helpful. Folks who have 'built something like this' often learn hard lessons in the process. PPPPP seems the primary lesson here. Incorporating the pipe into the vanity would have been my first thought. KIS!
We've been shopping the real estate market and have found several home where remodeling efforts failed to enhance the property's value as the obvious 'jury rigging' / non-standard work raised suspicions about how other systems may have been tinkered with in similar fashion.
It is difficult to 'fix' an issue from afar and as well from two-dimensional images that offer but a narrow view of the room (in this case).
My suggestion would be to move the vanity to the left flush up against the wall and hide the drain/vent piping in the vanity itself. That would prove worth the effort in the sense that it solves the exposed pipe and provides a 'standard' appearing result.
I see electrical devices on that wall to the left and would be concerned that a 'tall' cabinet might encroach upon one or more of them. And, as has been pointed out, going above the vanity counter with the enclosure idea requires dealing with the counter overhang. No matter how you accomplish that, the result will never look 'factory,' or 'standard' nor conventional.
What is the diameter of that waste/vent piping? Looks like 2" Curious to learn how it came to be in that location and what, if anything 'hid' it before. Wasn't the old vanity by any chance?
Good luck regardless your solution!
OooopsSo I jumped in the deep end and ... pre-drilled holes for the shelves and ... pre-drill some holes through the cabinet into the shelf to secure it.
View attachment 188687
Fool me once!
Never saw your result before posting my response!
Now, I understand what you were looking to do!
So, all I can say is "nevermind."
And, please drill pilot holes - don't "pre-drill some holes"
(;harles
Thanks Jim D. The scrap is something we have thought about as well, it just needs to be thin to fit under the other top....you might get lucky and be able to get a small scrap of granite or marble countertop cut to fit by a place doing counter tops.
With that said, I think my DW is leaning towards a mirror
Thanks for the suggestion. I wish I saw this earlier. I just stuck a scrap 2x up there. And since it is a tight spot and I had to angle the screw to find the stud, I'm leaving what I have...it's ugly but it works.Just a thought attach it to the wall with a french cleat
Charles, thank you very much for taking the time to provide your reply. I really appreciate it and those of the others on this forum.
Believe it or not, THIS was keeping it simple.
The original "vanity" did cover the pipe but it was really just a countertop with panelling for sides and a couple of doors on the front. They were able to cut the panelling and slide it over the pipe during construction. For a new vanity, I would have had to cut a section out of the entire side or cut and re-install the pipe - again too much work for me or maybe I should say more trouble than it's worth. I determined that the least invasive thing to do would be to cut a 4" hole in the side for the pipe and fittings to pass through. and of course build the cover for the pipe.
Thanks again for taking the time to reply and share your wisdom and experience.
I am sure it was meant to be helpful and that is how I took it. Really, I just wanted an excuse to use my tools and maybe "have" to buy some new ones. LOL.I think the 'more trouble' comment was meant to be helpful. Folks who have 'built something like this' often learn hard lessons in the process. PPPPP seems the primary lesson here. Incorporating the pipe into the vanity would have been my first thought. KIS!
Believe it or not, THIS was keeping it simple.
That is an excellent point. Unfortunately, not only is the view I provided narrow, but the room also. It is only a 4.5' x 10' bathroom so those were the best angles I could get that included the vanity and area in which I was working.It is difficult to 'fix' an issue from afar and as well from two-dimensional images that offer but a narrow view of the room (in this case).
After reality set in we ditched the idea of a tall set of shelves there.I see electrical devices on that wall to the left and would be concerned that a 'tall' cabinet might encroach upon one or more of them...
That just wasn't possible. The pipe is indeed 2". This is in a double-wide manufactured home and the interior wall are 2x3's. The top of the pipe for the vent is 1.5" so it is in the wall. To move the pipe would have required a lot more work, some under the house, that I did not want to get into nor pay for...thus the shelves.My suggestion would be to move the vanity to the left flush up against the wall and hide the drain/vent piping in the vanity itself...
What is the diameter of that waste/vent piping? Looks like 2" Curious to learn how it came to be in that location and what, if anything 'hid' it before. Wasn't the old vanity by any chance?
The original "vanity" did cover the pipe but it was really just a countertop with panelling for sides and a couple of doors on the front. They were able to cut the panelling and slide it over the pipe during construction. For a new vanity, I would have had to cut a section out of the entire side or cut and re-install the pipe - again too much work for me or maybe I should say more trouble than it's worth.
Thanks again for taking the time to reply and share your wisdom and experience.
LOL, it is all good.So, all I can say is "nevermind."
And, please drill pilot holes - don't "pre-drill some holes"
(;harles
So I'll ask the newbie question - what is the difference between "pilot holes and pre-drilled holes""
Thanks Jim D. I believe that is what I did. I pre-drilled pilot holes using a bit slightly smaller than the screw...and it seemed to work great since the piece did not splitPilot holes are more specialized. They ease the entry of the screw while maintaining its function.
Almost done...I have the box built and secured to the vanity. I used some Schluter tile edging instead of scribe strips. Also cut down a tile for the top (2 things about that: 1. I wish I would have had the long cut edge on the other side under the vanity top lip, but my DW says "you won't see it once it is caulked" and 2. The color looks much closer than what the picture shows)
With that said, my DW still has to do the caulking and some touch up paint. For some reason she did not paint the underside of the shelves. I guess she figured nobody would ever see them and of course they jump out in the pictures!!! (which I did not upload)
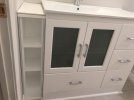
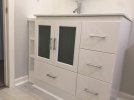
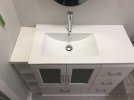
With that said, my DW still has to do the caulking and some touch up paint. For some reason she did not paint the underside of the shelves. I guess she figured nobody would ever see them and of course they jump out in the pictures!!! (which I did not upload)


Thank you very much.It looks pretty darn good considering where you started. Congrats!
I'm happy with it, but more importantly - my wife is happy with it.
I need to improve on my finishing skills but this was a good learning project.
Here is a side by side from where I started to where I am at now.
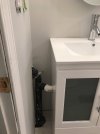
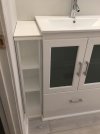
LATEST FOR SALE LISTINGS
-
-
Graco 395 FinishPro air assisted airless sprayer for sale
- Started by RobH
- Replies: 1
-
-
-
