Black Walnut, Nakashima-inspired side table (progress)

Status
Not open for further replies.

strobot

New User
Alex
I've been working on this side table amidst Kevin's help through my travails on the oak slab coffee table.

The influence comes from Nakashima's Minguren style.

100 bf of 50 year old rough cut black walnut.
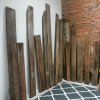
IMG_20150308_204033.jpg

This was educational. I learned how to avoid over-surfacing by checking my progress for flatness regularly.
20150218_201548.jpg

Before and after.
20150217_205724.jpg

A lot of shavings. This is a little more than half.
20150223_213453.jpg

Laminated wider 5/4 pieces for the boards, and 8/4 beams for the supports. One side of the top is a live-edge.
20150308_112153.jpg

I love my router plane. First time trying a bridle joint.
20150308_134156.jpg

Sawing the taper with a ryoba.
20150307_145030.jpg

The pieces, minus the cutout for the bottom bridle joint. I still need to plan and make the middle, vertical support beam, and shape the horizontal supports. Not sure how I'm going to handle those issues yet.
20150308_232754.jpg

You don't want to know how long I spend paring this joint to fit.
20150308_232442.jpg

Dry fit. I'm going to joint down the edge to remove the tearout.
20150309_223611.jpg

Profile.
20150309_223524.jpg

Majority of the tools used for this project so far.
20150309_002128.jpg
 

BeachBoy

New User
Jim
As someone moving in the direction of handtools myself, I really appreciate your WIP photos. Keep up the good work. And the table is looking great!
 

Mike Davis

Mike
Corporate Member
Hand plane chips are bigger and fluffier so it looks like a lot more wood was wasted, but probably no more than a machine would take off.

i like the design of this little table. Very nice work.
 

Hmerkle

Board of Directors, Development Director
Hank
Staff member
Corporate Member
Alex,
VERY nice work and love your "documentary" approach to showing us the WIP!

Thank you!
 

Roy G

Roy
Senior User
It's interesting that you use western style planes and Japanese style saws. Is this something you have worked out, or did it just happen for some reason? i have read some accounts of how it is easier to saw to a line with the Japanese saws.

Roy G
 

minnehahas

New User
Gary
I bought both types of saws about a year ago as I am trying to get much more integrated with hand tools and I reach for the Japanese saw more than the western ones. For me it just seems like the pull stroke is easier to control and more stable. I can follow a straight line with either type. Also when it comes to dovetails I use David Barrons magnetic guides and it makes doing dovetails go much quicker with less layout time. The Kerf of the 372 saw is so narrow...


It's interesting that you use western style planes and Japanese style saws. Is this something you have worked out, or did it just happen for some reason? i have read some accounts of how it is easier to saw to a line with the Japanese saws.

Roy G
 

strobot

New User
Alex
Thanks for all the kind words everyone!

It's interesting that you use western style planes and Japanese style saws. Is this something you have worked out, or did it just happen for some reason? i have read some accounts of how it is easier to saw to a line with the Japanese saws.

Roy G
Hi Roy - I'm just starting out, so all the tools I have were gathered in piecemeal and unplanned fashion. I got a good deal on the majority of Stanley planes that I own, and after tuning them up, they leave a great surface. I wanted to get the equivalent of a dovetail, carcass, and tenon saw, and it was much cheaper to get the equivalent Japanese saws. I enjoy how the pull saws cut, but since the only western saws I own are Disstons that are used for rough dimensioning, I can't compare them to the western versions. I'd have no reservations recommending the Gyokucho brand, which is what I purchased.
 

Augie

New User
Augie
WOW, you have way more patients than I do. LOL power tool guy my self other than some hand planes for large surface flattening. This is a beautiful table I mite add.
 

strobot

New User
Alex
Thanks, Tom & Augie!

Minor update: finished the vertical support, and beveled the ends of the foot. Now it's down to rounding the edges of support beams, sanding, gluing, then finishing!

Beveling the foot
20150313_225257.jpg

With the vertical support fitted
20150317_211939.jpg

Profile
20150317_212018.jpg
 

strobot

New User
Alex
I shortened the table by 3", glued up the base, beveled the ends of the upper horizontal support, and began applying the oil finish. I'm going to attach the top to the base with figure 8 fasteners.

20150329_121912.jpg
 

strobot

New User
Alex
Here we go!

Applied 3 coats of Watco Danish Oil w/ 300 grit sanding in between, buffed with #0000 steel wool, then finished with Minwax furniture wax. Fastened the top with figure 8 fasteners. I would NOT recommend buying the figure 8 fasteners from Rockler. They sell the fasteners and the screws as a kit and out of the box, the screw heads sit significantly proud of the fastener countersink. I had to countersink all the holes further to get the screw heads to sit flush in the hole. Not cool.
This is my first project with Black Walnut, and I'm proud of the result :)

Photo Apr 25, 11 34 30 AM.jpg
Photo Apr 25, 11 34 00 AM.jpg
Photo Apr 25, 11 34 20 AM.jpg
 
Status
Not open for further replies.

Premier Sponsor

Our Sponsors

LATEST FOR SALE LISTINGS

Top