Back to desk project

Status
Not open for further replies.

Charlie Buchanan

Charlie
Corporate Member
I took a break from posting on this project because my progress has been so slow. With wife's travel plans, holidays and weather interruptions it has been intermittent shop time. But here's where I am

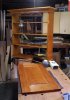
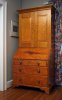
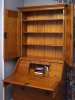
The bottom of the desk was moved in months ago and is in use waiting for the bookcase. Bookcase has been built and shellac applied ready for rubout and hardware.
attachment.php

Bookcase and one of the doors ready for hardware.

attachment.php

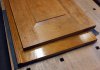
Here are the two doors The left-hand door on top has been rubbed out with steel wool and is ready for wax. The door on the bottom shows the shellac finish before the rubout.

attachment.php

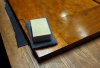
This is the rubout pad I use for cutting the shellac. It is 0000 Liberon steel wool backed by a felt pad. Works great on flat surfaces. For moldings I just ball up a pinch of wool and rub the molding by hand.

attachment.php

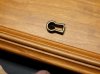
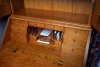
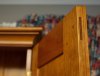
Here's an escutcheon laid out for fitting. I scratch around the inside perimeter and chisel it out a little more until I get a tight fit.

attachment.php

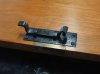
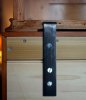
This is the inside latch mounted on the left door. It is a reproduction I found at Ball and Ball. Very similar to the one on the desk at Salem I am using as a model. It slides up and latches into a plate on the bottom of a shelf. The brass piece is the separate lockplate that the right door locks into.
 

Attachments

  • shelves and left door.jpg
    shelves and left door.jpg
    270.8 KB · Views: 283
  • two doors 2.jpg
    two doors 2.jpg
    296.9 KB · Views: 274
  • rubout pad.jpg
    rubout pad.jpg
    246 KB · Views: 274
  • fitting escutcheon.jpg
    fitting escutcheon.jpg
    250.5 KB · Views: 275
  • left door latch.jpg
    left door latch.jpg
    158.3 KB · Views: 280

mbromley

New User
Bromley
Looking good! Thanks for the details on your finishing process.
Do you mix your own Shellac? What cut do you use? And how many coats did you apply?
 

Charlie Buchanan

Charlie
Corporate Member
Looking good! Thanks for the details on your finishing process.
Do you mix your own Shellac? What cut do you use? And how many coats did you apply?

I use the Zinser canned Amber Shellac. I start out diluting it 1:1. Then build up to 1part alcohol to 2 parts canned shellac. I don’t have spray so I either brush or rag it on until it gets a good glossy build. 4 to 6 coats generally. The rub out with steel wool is what gives the final smoothness.
 

Jeff

New User
Jeff
Very nice Charlie!

A comment to clarify. The Zinsser Amber shellac contains wax and that's okay because you're doing a wax "topcoat/finish coat". Would you use dewaxed shellac flakes to do the same finish if wanting to apply a regular top coat like Waterlox or another wiping varnish?

The reason: nothing adheres to wax except more wax!
 

Charlie Buchanan

Charlie
Corporate Member
Very nice Charlie!

A comment to clarify. The Zinsser Amber shellac contains wax and that's okay because you're doing a wax "topcoat/finish coat". Would you use dewaxed shellac flakes to do the same finish if wanting to apply a regular top coat like Waterlox or another wiping varnish?

The reason: nothing adheres to wax except more wax!

Thanks for the comment.
If I’m going to finish with something other than shellac I start with dilute SealCote which is de waxed I think. Usually start with SealCote 1:1 on cherry as a sealer. Then hand sand 320 or so. Then anything I’ve used will go over that.
 

Bill Clemmons

Bill
Corporate Member
Love the Cherry w/ the amber shellac. And you craftsmanship is outstanding, as always. Can you post a few pics of the desk part already in use?
 

Charlie Buchanan

Charlie
Corporate Member
Final post on this project. Everything together only need to adjust a lockplate to eliminate door rattle. Thanks for all the comments and encouragement from past posts. This has been a big project for me and I have enjoyed every one of the many challenges it presented.
attachment.php

Temporarily located in a corner until my wife makes room for it in her office.

attachment.php

Back is 1/2 inch shiplap poplar that I dyed and finished with amber shellac to coordinate with the cherry color.
attachment.php

Detail of the desktop.
attachment.php

Door construction detail of through tenon and pins.
attachment.php

Detail of a hold down I made to keep the top from tipping with the doors open. Probably unnecessary if the desk is properly levelled for its final location, but my son was a climber when he was small and you can never tell when a rug rat is loose in the house. I chopped a mortise into the bottom shelf of the bookcase and made an L-shaped iron to hook into the mortise and screw to the back boards of the desk. That way it is not visible from the front even with the bookcase open and the desk top has no screw holes should it ever be separated from the bookcase. Also it will be easy to separate the pieces for moving.
 

Attachments

  • closed.jpg
    closed.jpg
    260.8 KB · Views: 194
  • Top open top half.jpg
    Top open top half.jpg
    284 KB · Views: 192
  • desk openn looking down.jpg
    desk openn looking down.jpg
    239.6 KB · Views: 191
  • thru mortise.jpg
    thru mortise.jpg
    183.9 KB · Views: 193
  • hold down.jpg
    hold down.jpg
    263 KB · Views: 182

Bill Clemmons

Bill
Corporate Member
It is a magnificent piece, Charlie. Thank you for sharing the build process w/ us. I especially like the figured grain on the desk front. Beautiful! In the picture of the hold-down from the back, it appears you used a sliding dovetail to attach the molding between the upper case and the desk. Am I seeing that correctly? If so, very nice detail.
 

Charlie Buchanan

Charlie
Corporate Member
...it appears you used a sliding dovetail to attach the molding between the upper case and the desk. Am I seeing that correctly? If so, very nice detail.[/QUOTE]
Thanks, Bill, yes there is a short section of sliding dovetail there glued to the molding but not to the case. The mounding is glued to th case at the front and nailed near the back. Not sure if the sliding dovetail would work alone. I’ll see how it holds up after a few years.
 

eyekode

New User
Salem
Wow Charlie! Those through tenons look perfect!
Also love the shellac finish on Cherry. Such a nice piece! Thanks for sharing.
 
Status
Not open for further replies.

Premier Sponsor

Our Sponsors

Top