Attaching cabinet face frames?

Status
Not open for further replies.

bluchz

bluchz
User
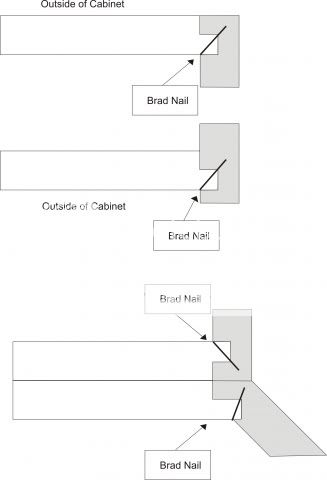
I am making kitchen cabinets and am worried about how i decided to attach the face frames. I assembled the face frames using pocket screws. The face frames had rabbits in them to align with the cabinet boxes.
IMG00011-20100708-1608.jpg

and
IMG00013-20100708-1609.jpg

I then attached the face frames to the boxes with glue and brads. Now that i am finished i am wondering if this is going to be strong enough? If it isn't i am going to look like this:BangHead: but i had seen cabinets that looked like they were made this way and am hoping i guessed right about the glue and brads to hold it all together.
 

Bas

Recovering tool addict
Bas
Corporate Member
I think it will be plenty strong. I've used biscuits to attach face frames, which helps both with alignment as well as strength. Glue on the plywood end grain won't hold particularly well, but you have quite a bit of surface area, and the brads help too. If you're worried, you can always add some pocket screws. That's how I attached the face frames on my cabinets, no glue, just pocket screws.
 

Canuck

Wayne
Corporate Member
Everything should be fine!:icon_thum:icon_thum

I have attached a lot of faceframes using this very method (glue and brads) and have never had one fail.

On a couple of cabinets I have done, I have used #10 biscuits and just glue. This worked well too. (This way I didn't have to worry about filling the brad nail holes!)

With the last garage wall cabinet I did, I just used pocket screws in the top and bottom of the faceframe where the pocket hole isn't noticeable.

Titebond II glue once cured is pretty darn strong, especially for a faceframe that isn't going to see a whole lotta wear and tear.

Wayne
 

Dean Maiorano

New User
Dino
You guessed right as long as you're shooting the nails in from the side, angled towards the front of the cabinet, up into the meat of the face frame. I assume that is what you're doing so I assume you're fine. If that's 3/4' ply I think you'll be fine with the side grain of the plywood, as they do alternate orientation of layers.

I love epoxy and use it everywhere I can. You could epoxy the faces to the boxes and the grain orientation will be less an issue (epoxy rules - it can handle 1/8" gaps). There's also the option of gluing (epoxying!) some support blocks onto the face, from the interior side but not in the interior - on the top and bottom of the box (where it looks like you have the space to do so - hard to tell from such small pictures). Those blocks can also be brad nailed into the plywood (and the FF) if the wood can handle it - the blocking will need to be thin enough to hide behind the face frame overhang.

Both the glue/brad nail attachment method you chose and the support blocking I mentioned are tactics I've seen on mass produced cabinets. I know yours aren't mass produced but relax, they aren't mess produced either!:gar-Bi

Dean
 
Last edited:

blazeman45

Steve
Senior User
Everything should be fine!:icon_thum:icon_thum

I have attached a lot of faceframes using this very method (glue and brads) and have never had one fail.

+++++10

When I built cabinets that was the method I used... Never had a problem!!!!!!!
 

lwhughes149

New User
Lorraine
Here's one more suggestion. Attach the faceframe with glue and wood screws which will be covered with dowels of the same wood. I used brads and glue on my kitchen cabinets several years ago and I was pleased with the results. I am making cabinets for a neighbor and found myself with a difficult corner cabinet. I had to use wood screws and dowels and found there result to be nice. Client is happy.
 

CrealBilly

New User
Jeff
I think it will be plenty strong. I've used biscuits to attach face frames, which helps both with alignment as well as strength. Glue on the plywood end grain won't hold particularly well, but you have quite a bit of surface area, and the brads help too. If you're worried, you can always add some pocket screws. That's how I attached the face frames on my cabinets, no glue, just pocket screws.

When I saw the title of this thread, somehow I knew Bas would suggest biscuits :gar-La;
 

Dean Maiorano

New User
Dino
Bluchz,

I looked at one of your previous posts on this same subject and it looks like you're using 1/2" plywood? That might make some of the suggestions posted here harder to implement than others.

When I responded to this thread earlier I forgot to mention that when I ran a small cabinet shop, for an area non-profit, I used the dadoed face frame/glue/nail through the side method as well. It's a very common. My variation was that I used staples, it spread the load, it is a common variation.

Here's a great picture drawing of the face frame mounting that I used, it is an overhead view:

faceframemounting.jpg


(I found the picture on the internet at this URL - http://www.woodworkingtalk.com/f5/joining-face-frame-corner-cabinet-11541/ - they were having the same discussion apparently).

When I made cabinets I made the tops and bottoms of the face frame's inner edges flush to the box's top and bottom in-side. Doing so keeps items that are being pulled out the cabinet from bumping into a lip. A lot of mass produced cabinets are made the same way. Such construction makes the cabinet 'ambidextrous' - the top can be the bottom and vice versa. Here's some pictures showing what I mean:

cabinetconstructionC.gif


cabinetconstructionB.gif


(Those were found here - http://www.renovation-headquarters.com/cabinets-wall-cabinets-4.htm)

When you make the cabinet that way, with the face frame's top + bottom inside edges flush to the box's inside edge, you may end up with face frame overhang on the top + bottom, depending on your FF's stock width. If the overhang is sufficient enough, it is behind THAT that I was suggesting you put a 'support block' earlier. Capiche?

Dean
 
Last edited:

Dean Maiorano

New User
Dino
Bluchz,

After taking a magnifying glass to your pics I can see that you do indeed have the outside edges of the sides of the face frame flush to the out-side of the box and the top/bottom of the face frame's inner edges flush with the in-side of the box. Therefore you do have 'recesses' at the top and bottom of the box and therefore you can hide support blocks behind the face frame, on the top and bottom, if you so desire their additional reinforcement. I think I'm reading those images right, correct?

Dean
 

Fred85

New User
Josh
you might could even do pocket holes with contrasting plugs (e.g. walnut), depending on your taste....
 

CrealBilly

New User
Jeff
Have you seen the Blind Nail Set? Pop those into the plywood, spread a bead of glue, position your face frame, smack it with a hammer and a block of wood. Shaazzam, no nail holes to fill.
Watch the video It'll make sense.
https://www.fastcap.com/estore/pc/viewPrd.asp?idcategory=3&idproduct=9916

Mark that's a neat idea... but $10.00 for the tool and $5.00 for 80 nails seems a bit excessive.

I really didn't want to post my hillbilly method for attaching face frames to cabinets but now I have no choice. You can do the same with a hammer and regular old trim nails, pound the trim nail in from the back side of the face frame cut the head off the trim nail at a angle with a pair of wire cutters. Apply a bead of glue to the cabinet, align the face frame on the cabinet and tap your frame into place with a block of wood and a hammer. That's how I do it, works well and is resourceful. You can pick up a pound of trim nails for a few bucks and there is way more than 80 nails in a pound.
 

Tarhead

Mark
Corporate Member
$12.50 for the tool and 100 nails isn't too bad. https://www.fastcap.com/estore/pc/Blind-Nail-Kit-p9962.htm

The Fastcap version has the lip midway on the nail that gives you a little more guarantee the protruding part will actually go into the trim instead of being pushed into the base which has happened to me. It left me with a section which didn't seat tight against the cabinet riser and I had to scramble a get clamps on it before the glue dried. Of course the piece slid a little when I clamped it so it dried crooked. I can flat fill up the Cuss jar with quarters when that happens :gar-Bi
 

Joe Lyddon

New User
Joe Lyddon
$12.50 for the tool and 100 nails isn't too bad. https://www.fastcap.com/estore/pc/Blind-Nail-Kit-p9962.htm

The Fastcap version has the lip midway on the nail that gives you a little more guarantee the protruding part will actually go into the trim instead of being pushed into the base which has happened to me. It left me with a section which didn't seat tight against the cabinet riser and I had to scramble a get clamps on it before the glue dried. Of course the piece slid a little when I clamped it so it dried crooked. I can flat fill up the Cuss jar with quarters when that happens :gar-Bi

I've got that lil tool... haven't used it yet.

I'm about to start making a few book cases... I will be using Pocket screws for the face frame and I'm looking forward to using these lil nails...

I think they will work out very nicely... will let you know.
 
Status
Not open for further replies.

Premier Sponsor

Our Sponsors

LATEST FOR SALE LISTINGS

Top