A Finish For Walnut

Status
Not open for further replies.

Wyatt Co.

New User
Bill
Tell us how you'd use it to answer the OPs questions. :confused:

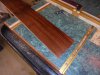
At this point in the thread, the concern is finish and glue squeeze out. With waxilit used at the areas of glue joinery and on the surfaces that is to be finished (after assembly), the excess glue peels right off and the waxilit is easily removed before finish is applied.

It can also be used in reverse. In other words, applied to areas where glue is to be desired, apply waxilit where you don't want finish, then apply finish, then remove the waxilit and do the glue up.
 

Wyatt Co.

New User
Bill
Waterlox is good. I use a homemade.....3-2-1.
3 parts mineral spirits
2 parts poly
1 part boiled linseed oil...

Why would you use BLO in a diy "waterlox" mix?

Waterlox is Tung oil based and there is a HUGE difference between Tung oil and BLO.
 

Scott Cardais

New User
ScottC
Rick:

Very interesting design. Nice work.

My 2 cents ...

Shellac probably isn't a great finish for the top of the table if you think alcohol might spill on it. Alcohol will dissolve the finish. It's not to difficult to fix if that happens but you can avoid the issue by using something else on the top - such as Waterlox people are recommending below.

OTH - shellac is a great finish for everything but the top. I've used it on several walnut projects. Answers to your questions:

What's a good finish: Dewaxed - Shellac (Zinzer or mix your own using flakes) on everything but the top. Waterlox or equal on the top.

Schedule: Shellac is fast. I usually thin the first coat by about a 1/4. It penetrates quickly and dries in less than 30 mins. Then, I do a light sanding to knock off the nibs with 180 or 220. I do this for 3 - 4 additional coats of un-thinned shellac. I can usually get 3 coats done in a day. I've used a brush and a pad but I prefer a pad. However, I've seen several professionals such as Paul Sellers recommend using a brush. It's probably just my technique but I always get streaks when I use a brush.

Process: I usually apply the finish before glue up, especially interior spaces that would be hard to reach after assembly. I've always assumed that my joints would be stronger if the mating surfaces were bare but I've never done any testing to prove it. Using a pad instead of a brush gives me more control to prevent getting shellac on my joints.

Like others who've replied, I've also used spray lacquer from a can and it's worked great for me on smaller projects. It's also very fast and easy to apply without drips if you apply light coats. Easy to get multiple coats in a day. But, like shellac, I wouldn't use it for a top that might see alcohol spills.
 

ncfromnc

New User
neil
I guess my post was confusing. I meant:
Waterlox is good.......but I don't use it. I use a homemade concoction that is Linseed oil / poly based called 3-2-1. It is NOT homemade Waterlox. It is just a homemade finish I use. I believe this 3-2-1 is a Maloof finish.
 

Jeff

New User
Jeff
That's an interesting solution to glue squeeze out and its easy removal. Never heard of it but it was Michael Fortune who discovered it for glue squeeze out.

http://www.finewoodworking.com/2013/02/07/never-struggle-with-squeeze-out-again

I sand all of my parts up to P220-grit before applying the wax. Also, I dry-fit the joints and clamp them. With the joint tightly together, you can spread the wax with no fear that it will get on any of the glue surfaces.


Wyatt Co.

New User
Bill
That's an interesting solution to glue squeeze out and its easy removal. Never heard of it but it was Michael Fortune who discovered it for glue squeeze out.

http://www.finewoodworking.com/2013/02/07/never-struggle-with-squeeze-out-again

I sand all of my parts up to P220-grit before applying the wax. Also, I dry-fit the joints and clamp them. With the joint tightly together, you can spread the wax with no fear that it will get on any of the glue surfaces.


I've only seen one other on here mention it and I think it was Willemjm but I wouldn't swear to that.

Waxilit doesn't harden and dry like furniture paste wax. It really is easy to remove without just spreading from place to place which is common when trying to remove paste wax. I have found mineral spirits removes it easier than the recommended alcohol.

It's awesome stuff!
 

Rick_B

Rick
Corporate Member
OK - now I emember why I got way from waterlox - I could never keep it from gelling up. However, I did see the "squeeze the can" trick on the AskWoodman video. Waterlox seems to be the predominant recommendation for a more protective finish. So a couple of waterlox specific questions
1. I see on Amazon that there are lots of choices - but the satin seems to be a lot more expensive. Is the original sealer/finish a glossy product?
2. Can Waterlox be wiped on right out of the can or does it need thinned?

Thanks
Rick
 

Jeff

New User
Jeff
Gelling is caused by oxygen. You have to use Bloxygen (argon gas) which blankets the unused product in the original container. Only pour out what you need for a finish and don't pour any leftovers back into the original container. I know this from $$ lost experience before I learned about Bloxygen. I usually buy 3 or 4 cans so there are spares on the shelf for next time.

http://www.bloxygen.com

I use the Original Sealer/Finish which is about 50% sheen and the satin is about 25% sheen. The Original can be knocked back with steel wool or ScotchBrite pads if you wish so it approximates the satin. You don't need to thin it and probably shouldn't either.

https://www.waterlox.com/products-item/waterlox-original-penetrating-tung-oil-floor-sealer-finish
 

Rick_B

Rick
Corporate Member
OK - I need to make a decision so here is my proposed finishing schedule:
1. Finish unassembled (masking joints)
2. Sand 100, 120, 150 (maybe 180) with vacuuming between grits
3. Waterlox original finish - glad I looked a little closer as it is available at Klingspor - no on line waiting
4. Plan on using a wipe on process - easier to control joint areas
5. 2 wipe on coats of waterlox
6. Scuff after 2nd coat with 220 grit and after the 3rd and 4th coats
7. fifth and final coat
8. paste wax

I'm still on the fence about when to finish (before or after assembly) - seems with wipe on after assembly might be a reasonable alternative. I'm going to try on a sample piece of material.

Still open to other suggestions

Thanks
Rick
 

Jeff

New User
Jeff
I'm still on the fence about when to finish (before or after assembly) - seems with wipe on after assembly might be a reasonable alternative. I'm going to try on a sample piece of material.[/QUOTE

You could do a mix of pre-assembly finishing (4, 5, and 6), glue up, then coats 3,4, and 5. I'm biased towards pre-finishing individual pieces because I've done the Farmers "we know a thing or two because we've seen a thing or two" with glue up, glue squeeze out clean-up, finish several times with sanding, etc.

https://vimeo.com/150181996
 

Rick_B

Rick
Corporate Member
Well I completed a test board
[attachment=1]Test Board 1.JPG[/attachment]


[attachment=0]Test Board 2.JPG[/attachment]


The schedule I used was
1. sand to 150
2. Vacuum
3. Wipe with cotton cloth
4. 2 coats of waterlox (morning and evening)
5. Lightly sand with 320 grit after 24 hours
6. 4 additional coats of waterlox (1 every day)
7. Sand lightly with 320 after coats 3, 4 and 5
8. wet sand after coat 6 with 600 wet/dry paper and MS lubricant
9. Paste wax
attachment.php
attachment.php


I'm liking both the look and feel and, more importantly, Patty likes it :).


I also a friend's advice and prepared some mortice fillers for the real thing. I started that this morning. Any thoughts/suggestions are appreciated


Thanks
Rick
 

Attachments

  • Test Board 1.JPG
    Test Board 1.JPG
    128.8 KB · Views: 265
  • Test Board 2.JPG
    Test Board 2.JPG
    115.1 KB · Views: 255

Scott Cardais

New User
ScottC
The process you described to finish the test piece sounded very time consuming - something you said that you were concerned about in your original post.

You could save several days by using dewaxed shellac as an undercoat (s) and one or two coats of Waterlox for the final finish. Worth a try anyway. I think the final result would be the same.
 

bash

New User
bash
That finish looks really good. And if the wife likes it, .....

I never thought of mortise fillers but look forward to hearing how they work as I am currently building 4 end tables (mortise and tenon joinery) and am within a week or two of starting the finish process for two of them.
 

Jeff

New User
Jeff
I also a friend's advice and prepared some mortice fillers for the real thing. I started that this morning. Any thoughts/suggestions are appreciated

What are mortise fillers and why would you want or need to use them? Curious.
 

Rick_B

Rick
Corporate Member
What are mortise fillers and why would you want or need to use them? Curious.

Well Jeff - I was concerned with the waterlox running into the mortises and sealing the walls resulting in poor glue bonding with the tenons. Was I overthinking this? the "fillers" were essentially short pieces of fake tenons.

Looking forward to your thoughts regarding the waterloix sealing the mortice walls - because the whole filler concept is a pain

Rick
 

Wyatt Co.

New User
Bill
My usual way is with painter's tape is to mask the mortise lengthwise with a strip a bit wider and longer than the mortise and then wrap the tenons in the tape too. Sand and pre-finish, then the glue up. A little final sanding and more finishing is optional but at least you won't have nooks, crannys, and corners to aggravate you.

↑this↑
 

Jeff

New User
Jeff
Was I overthinking this? the "fillers" were essentially short pieces of fake tenons.

I understand, yes you're overthinking something that is probably less effective at temporarily "sealing" the joint than painter's tape. It's a whole lot easier to just use blue painter's tape on the mortises and also the tenons. You may get a little finish seepage underneath the tape edges but that's not a show stopper for a solid and strong glue joint later.
 

Wyatt Co.

New User
Bill
Also, don't use "clean release" painters tape. The adhesion is fairly weak. Use the absolute cheapest painters tape you can find. Dollar store brand is excellent.
 

Rick_B

Rick
Corporate Member
Thanks for the thoughts folks - unfortunately I am alsmost done with the waterlox application. I tried the tape but fekt that I would have had too many areas where the tape would have left an exposed (unfinished) area outside of the shoulder of the tenon. In hindsight - it would have been a lot easier to touch up those areas than the method I am using - live and learn

Rick
 

bash

New User
bash
I look forward to seeing pictures of the finished products. From pictures in post 1 and your test board finish, I know the tables will be awesome. I have also learned a few things reading this thread, so thanks.
 
Status
Not open for further replies.

Premier Sponsor

Our Sponsors

LATEST FOR SALE LISTINGS

Top